Fine-tune an Agent without an LLM 🔒
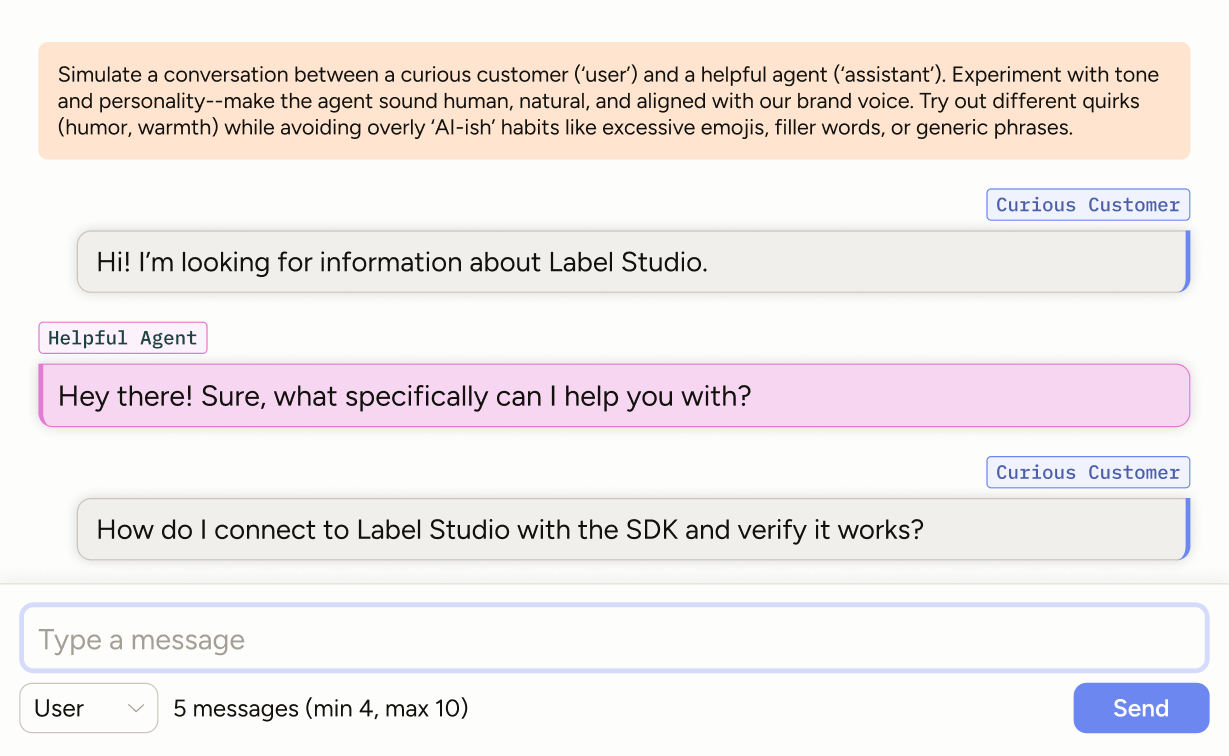
Simulate multi‑turn chats by playing both user and assistant (or pair with a teammate). Capture tone, style, and persona for fine‑tuning—using human‑written dialogs to avoid the generic “frontier chatbot” voice.
Enterprise
This template requires Label Studio Enterprise or Starter Cloud.
For Community users, see our Conversation AI templates or the Multi-Turn Chat Evaluation template.
Labeling configuration
<View>
  <Style>
    .lsf-richtext__container.lsf-htx-richtext {
      font-size: 16px !important;
      line-height: 1.6;
      padding-top: 10px;
      padding-bottom: 10px;
      background-color: var(--color-kiwi-100);
      color: var(--color-kiwi-800);
  }
  <!-- Remove excess height from the chat to allow space for instruction text -->
    .htx-chat {
      --excess-height: 275px
    }

</Style>

  <Text name="instructions" value="$text" />

  <Chat name="chat" value="$chat" toName="chat"
        minMessages="4"
        messageroles="user,assistant"
        editable="true" />
</View>
About this labeling configuration
Style
You can apply styling using inline styles directly on View tags or by defining CSS rules for classes in a <Style> block. Those classes are then applied within the labeling configuration using the className parameter.
This labeling configuration uses built-in classes and attributes to apply styles.
.lsf-richtext__container.lsf-htx-richtextare built-in classes targeting text, in this case allowing you to apply styling to the instruction text..htx-chattargets the height of the chat window.
For more information, see the Style tag.
Text
Above the chat there are instructions guiding the user as to what they should try to achieve with the text.
You can hard-code this into the labeling configuration (<Text value="Your instruction text" />), but if you are going to have multiple tasks within a project, you will likely want to specify the text as part of the imported data.
In this example, we use $text because the input JSON uses "text". See input data below.
For more information, see the Text tag.
Chat
The Chat tag provides an interface where the annotator can type and send messages. Because this configuration is not sending prompts to an LLM, the annotator will choose a role before sending the chat.
<Chat name="chat" value="$chat" toName="chat"
        minMessages="4"
        messageroles="user,assistant"
editable="true" />value: This is required, and should use a variable referencing your input data. In this example, we use$chatbecause the input JSON uses"chat".nameandtoName: TheChattag is unique in that it can act as both an object tag and a control tag.In this configuration, there are no control tags referencing the
Chatobject. Therefore for your labeling configuration to be complete, you need to have theChattag reference itself inname="chat"andtoName="chat".This is the only tag that is allowed to reference itself in this way.
minMessages: The minimum number of messages users must submit to complete the task. You can also set a maximum.Both minimum and maximum can also be set in the task data, allowing you to have different limits for each task. For an example, see Chatbot Evaluation.
editable: Messages within the chat are editable. To modify this so that only messages from certain roles are editable, you can specify them (for example,editable="user,assistant").messageroles: The annotator will see a drop-down menu with user and assistant roles that they can choose from when sending messages.You can customize this parameter with
user,assistant,system,tool, anddeveloper.
For more information and additional parameters, see the Chat tag.
Input data
The Chat tag accepts JSON data.
Empty chat
The following would provide an empty chat window and instruction text for the annotator:
{
  "data": {
    "text": "Simulate a conversation between a curious customer ('user') and a helpful agent ('assistant'). Experiment with tone and personality—make the agent sound human, natural, and aligned with our brand voice. Try out different quirks (humor, warmth, brevity) while avoiding overly ‘AI-ish’ habits like excessive emojis, filler words, or generic phrases.",
    "chat": []
  }
}
Imported chat messages
You can also import demo chat messages as follows:
{
  "data": {
    "text": "Simulate a conversation between a curious customer ('user') and a helpful agent ('assistant'). Experiment with tone and personality—make the agent sound human, natural, and aligned with our brand voice. Try out different quirks (humor, warmth, brevity) while avoiding overly ‘AI-ish’ habits like excessive emojis, filler words, or generic phrases.",
    "chat": [
        {
            "role": "user",
            "content": "Demo chat message 1"
        },
        {
            "role": "assistant",
            "content": "Demo chat message 2"
        },
        {
            "role": "developer",
            "content": "Demo chat message 3 "
        }
    ]
  }
}
attention
The chat messages that you import are not selectable. This means that you cannot edit them or apply annotations (ratings, choices, etc) to them.
You can only select and annotate messages that are added to the chat by an annotator or that are imported as predictions.