Freeform Metadata

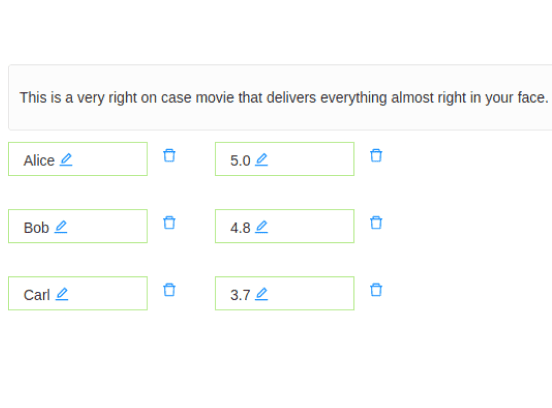
If you want to collect metadata for a text sample for tagging purposes, or another reason, use this template to provide a table for annotators to type in freeform metadata about a text passage. You can modify this template to show an image or another data type by using a different tag.
Interactive Template Preview
Labeling Configuration
<View>
  <Style>
    input[type="text"][name^="table"] { border-radius: 0px;}
    input[type="text"][name^="table_value"] { border-left: none; }
    div[class*=" TextAreaRegion_mark"] {background: none; height: 33px; border-radius: 0; min-width: 135px;}
  </Style>
  <Text value="$text" name="text"/>
  <View style="display: grid;  grid-template-columns: 1fr 1fr; max-height: 300px; width: 400px">
    <TextArea name="table_name_1" toName="text" placeholder="name" editable="true" maxSubmissions="1"/>
    <TextArea name="table_value_1" toName="text" placeholder="value" editable="true" maxSubmissions="1"/>
    <TextArea name="table_name_2" toName="text" placeholder="name" editable="true" maxSubmissions="1"/>
    <TextArea name="table_value_2" toName="text" placeholder="value" editable="true" maxSubmissions="1"/>
    <TextArea name="table_name_3" toName="text" placeholder="name" editable="true" maxSubmissions="1"/>
    <TextArea name="table_value_3" toName="text" placeholder="value" editable="true" maxSubmissions="1"/>
  </View>
</View>
About the labeling configuration
All labeling configurations must be wrapped in View tags.
Use the Style tag to control how the table for freeform metadata appears.
<Style>
    input[type="text"][name^="table"] { border-radius: 0px;}
    input[type="text"][name^="table_value"] { border-left: none; }
    div[class*=" TextAreaRegion_mark"] {background: none; height: 33px; border-radius: 0; min-width: 135px;}
</Style>
The styles in this tag are used to modify the styling of the object and control tags used in this labeling configuration. The input parameter applied to name^="table" specifies the borders of the tabular data, and the input parameter applied to name^="table_value" specifies the borders of only the table values. Similarly, the div option modifies the existing styles of the TextArea control tag, assigning a background and other CSS styles to override the default styles.
Use the Text object tag to specify the text to label:
<Text value="$text" name="text"/>Add styling to the View tag to control how to display the TextArea tags in a grid form:
<View style="display: grid; grid-template-columns: 1fr 1fr; max-height: 300px; width: 400px">Use the TextArea control tag to display editable text boxes to annotators, with placeholder values:
<TextArea name="table_name_1" toName="text" placeholder="name" editable="true" maxSubmissions="1"/>
<TextArea name="table_value_1" toName="text" placeholder="value" editable="true" maxSubmissions="1"/>
<TextArea name="table_name_2" toName="text" placeholder="name" editable="true" maxSubmissions="1"/>
<TextArea name="table_value_2" toName="text" placeholder="value" editable="true" maxSubmissions="1"/>
<TextArea name="table_name_3" toName="text" placeholder="name" editable="true" maxSubmissions="1"/>
<TextArea name="table_value_3" toName="text" placeholder="value" editable="true" maxSubmissions="1"/>