Set up Microsoft Azure Blob storage
Connect your Microsoft Azure Blob storage container with Label Studio. For details about how Label Studio secures access to cloud storage, see Secure access to cloud storage.
Set up CORS for Azure blob storage
If you are planning to use proxy storage, you can skip this step.
If you are planning to use pre-signed URLs, you must configure CORS.
For more information, see Pre-signed URLs vs. Storage proxies.
In the Azure portal, navigate to the page for the storage account.
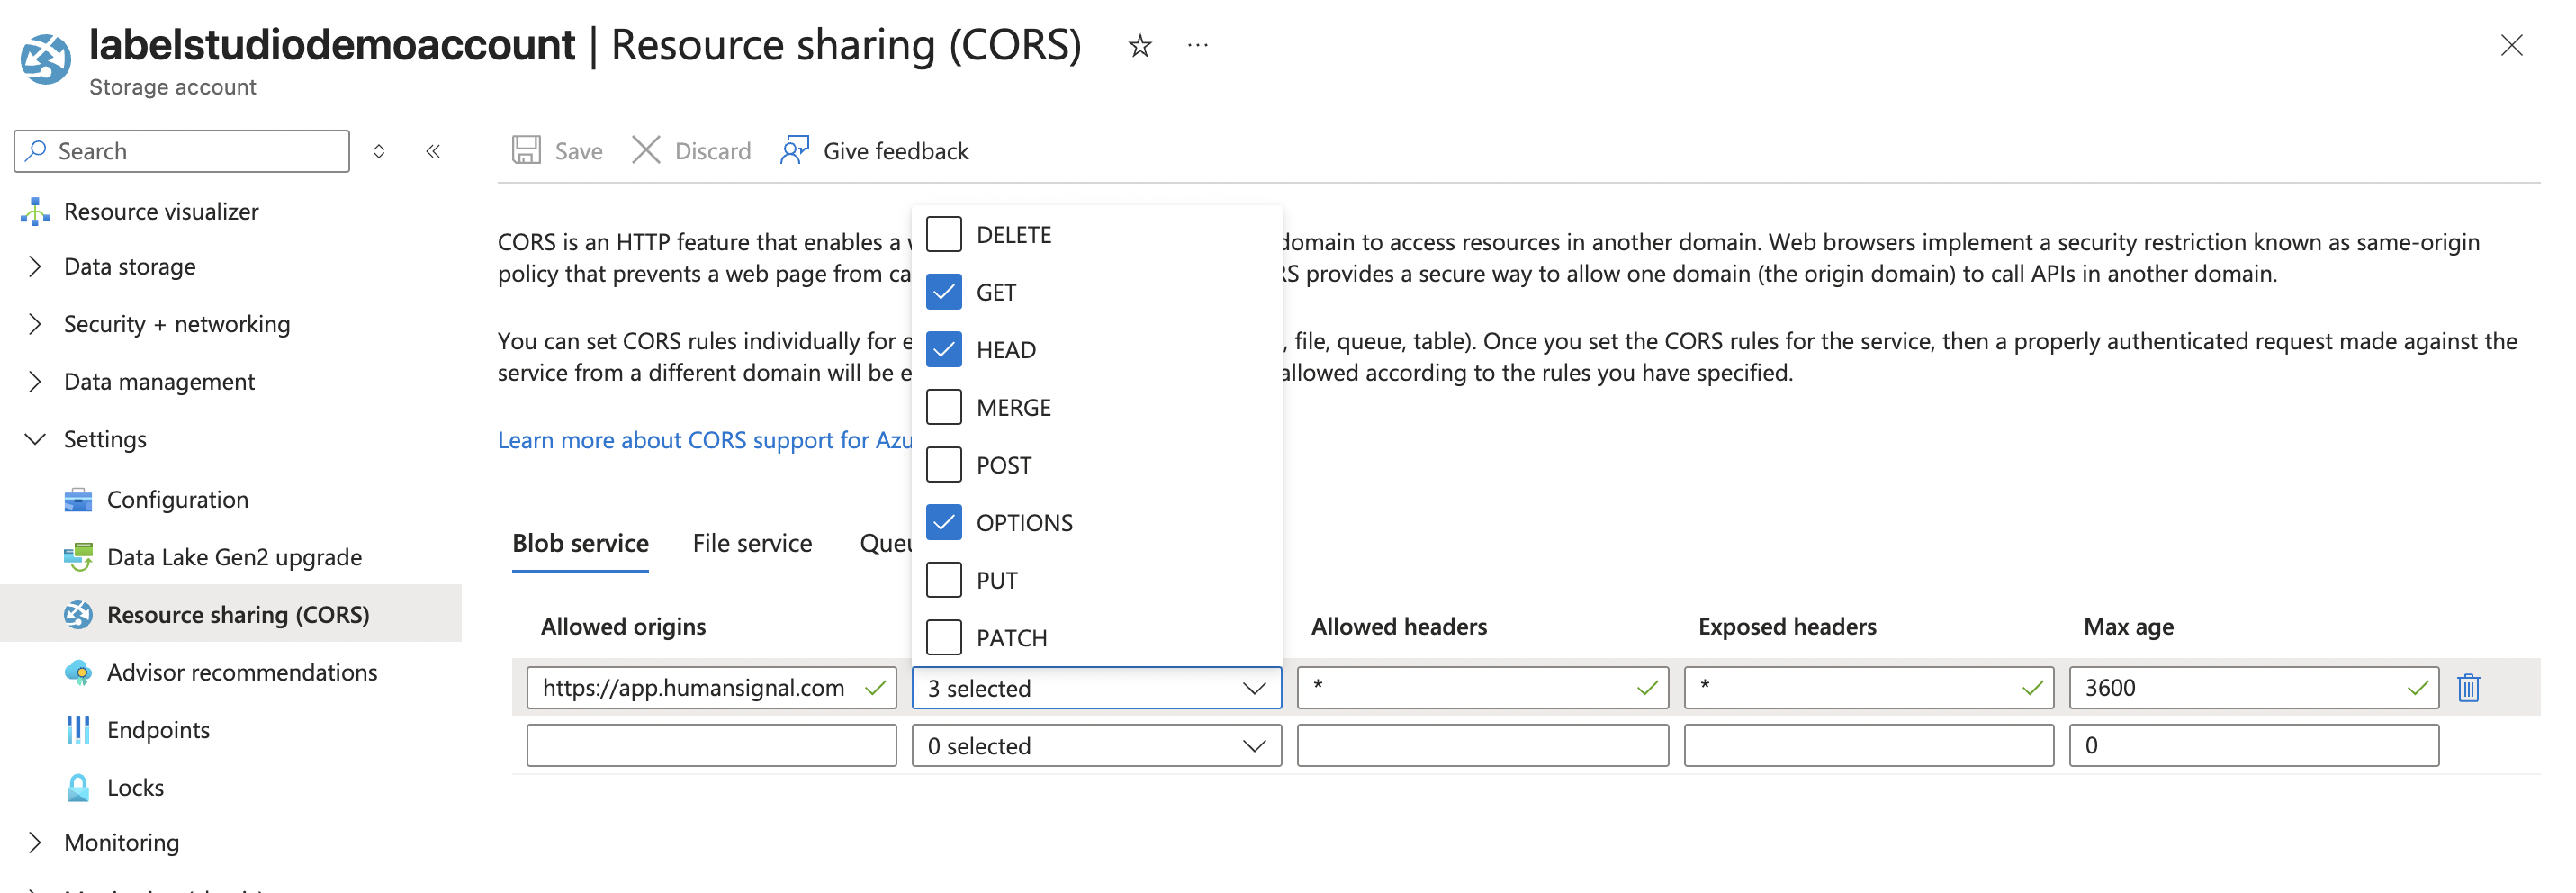
From the menu on the left, scroll down to Settings > Resource sharing (CORS).
Under Blob service add the following rule:
- Allowed origins:
https://app.humansignal.com(or the domain you are using) - Allowed methods:
GET, HEAD, OPTIONS - Allowed headers:
* - Exposed headers:
* - Max age:
3600
- Allowed origins:
Click Save.
Azure blob storage
Before you begin, review the information in Cloud storage for projects and Secure access to cloud storage.
You will also need to provide the following information. It can all be found on the resource page for your storage account in the Azure console.
You will need:
- The name of the container you are using
- The name of your storage account
- The access key associated with your storage account
Tip
If you are working in an on-prem deployment, you can set the AZURE_BLOB_ACCOUNT_NAME and AZURE_BLOB_ACCOUNT_KEY environment variables instead of manually adding them into the UI.
Create a source storage connection
From Label Studio, open your project and select Settings > Cloud Storage > Add Source Storage.
Select Azure Blob Storage and click Next.
Configure Connection
Complete the following fields and then click Test connection:
| Field | Description |
|---|---|
| Storage Title | Enter a name to identify the storage connection. |
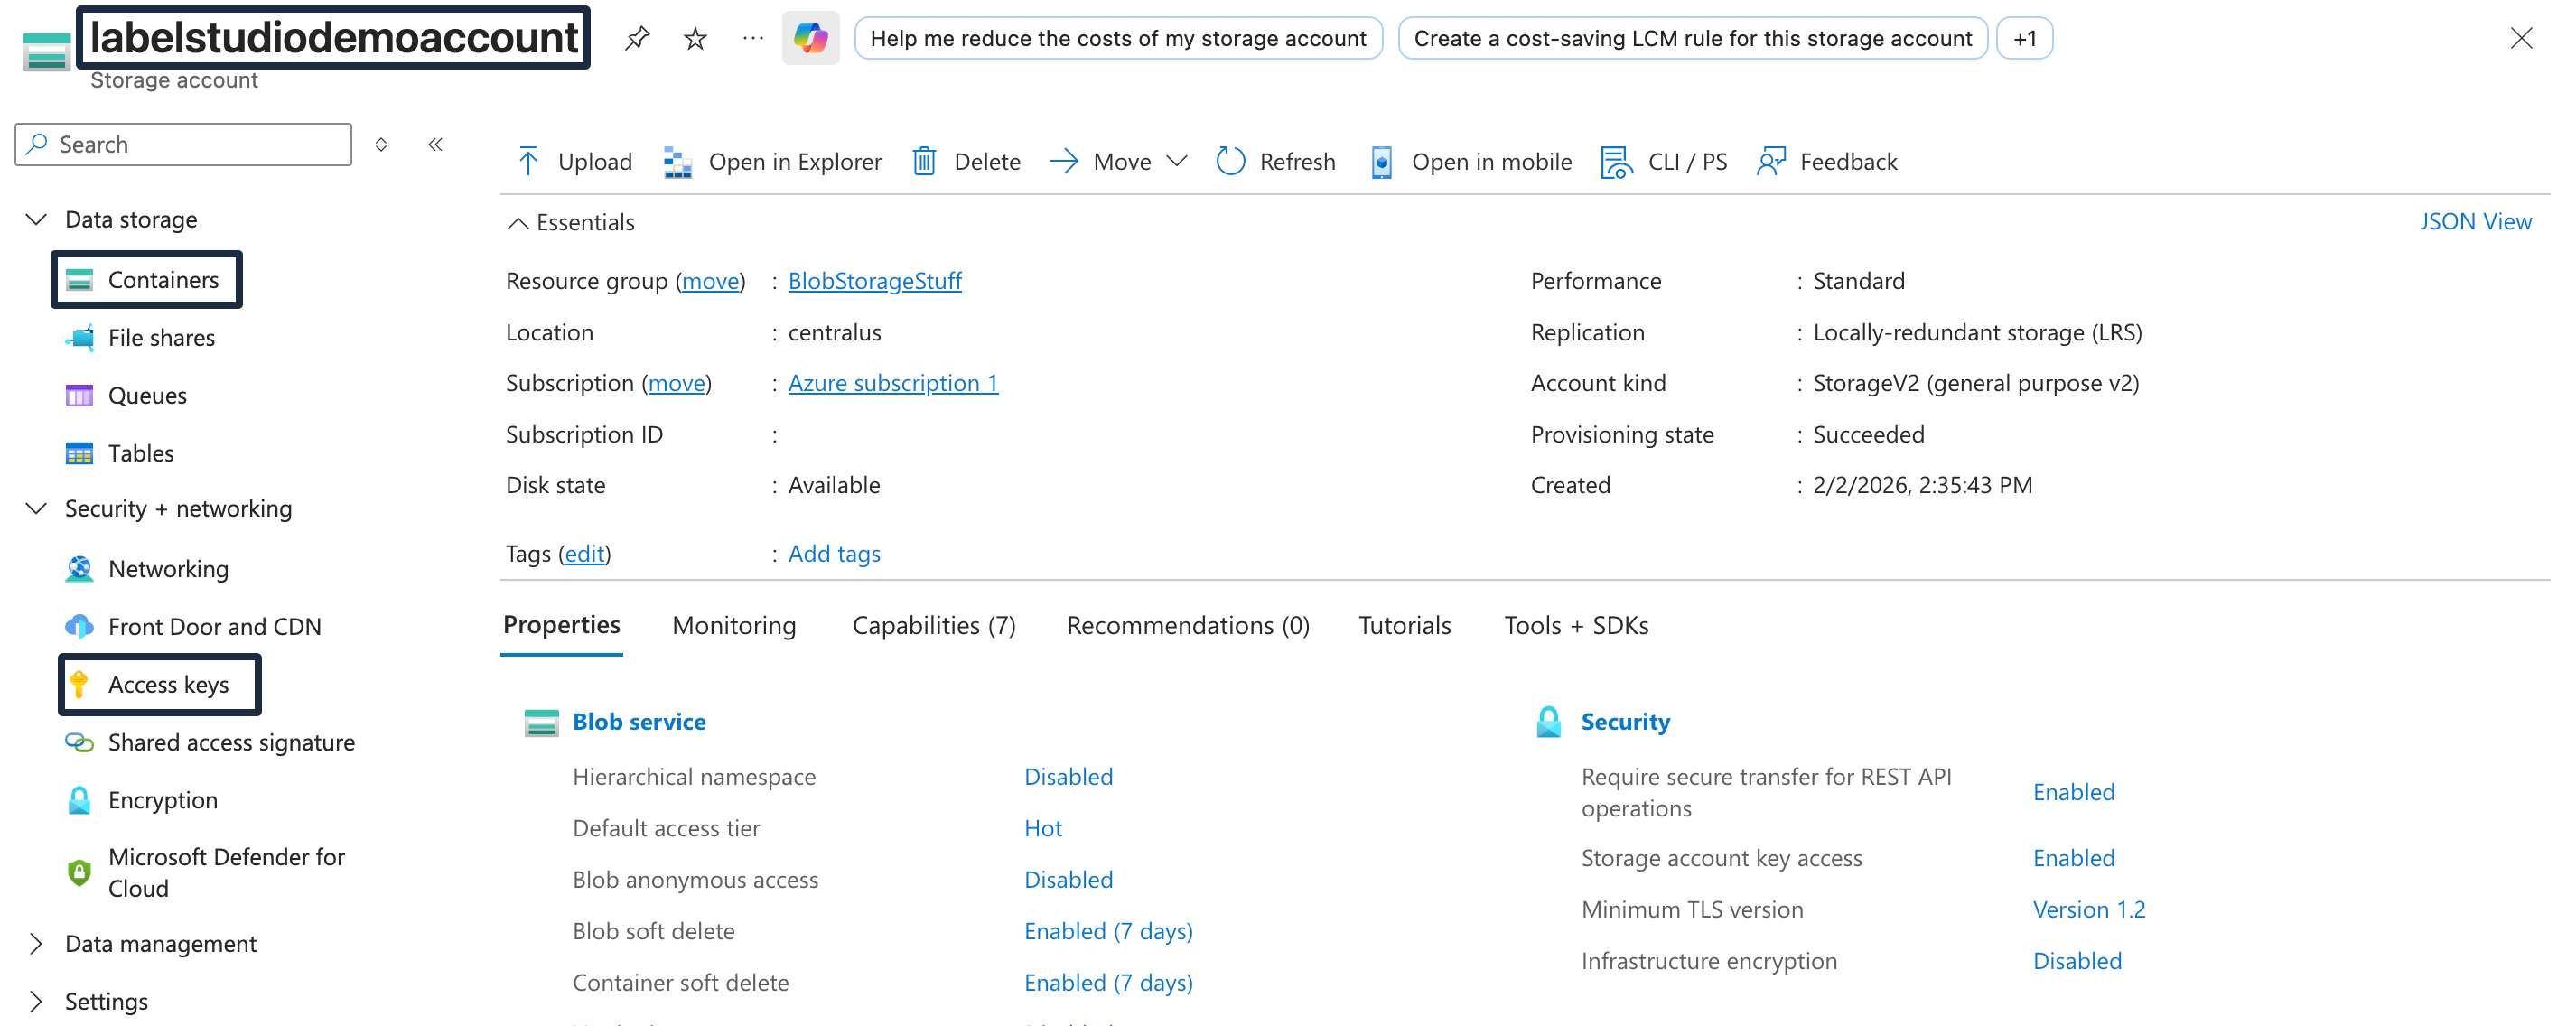
| Container Name | Enter the name of your Azure storage container. This can be found in the Azure console on your storage account resource page under Data storage > Containers. (See the screenshot above.) |
| Account Name | Enter the name of your Azure storage account. (See the screenshot above.) |
| Account Key | Enter the access key for your Azure storage account This can be found in the Azure console on your storage account resource page under Security + networking > Access keys. (See the screenshot above.) |
| Use pre-signed URLs (On) / Proxy through the platform (Off) |
This determines how data from your container is loaded:
For more information, see Pre-signed URLs vs Storage proxies. |
| Expire pre-signed URLs (minutes) | Control how long pre-signed URLs remain valid. |
Import Settings & Preview
Complete the following fields and then click Load preview to ensure you are syncing the correct data:
| Bucket Prefix | Optionally, enter the directory name within your container that you would like to use. For example, data-set-1 or data-set-1/subfolder-2. |
| Import Method | Select whether you want create a task for each file in your container or whether you would like to use a JSON/JSONL/Parquet file to define the data for each task. |
| File Name Filter | Specify a regular expression to filter container objects. Use .* to collect all objects. |
| Scan all sub-folders | Enable this option to perform a recursive scan across subfolders within your container. |
Review & Confirm
If everything looks correct, click Save & Sync to sync immediately, or click Save to save your settings and sync later.
Tip
You can also use the API to sync import storage.
Create a target storage connection
From Label Studio, open your project and select Settings > Cloud Storage > Add Target Storage.
Select Azure Blob Storage and click Next.
Complete the following fields:
| Storage Title | Enter a name to identify the storage connection. |
| Container Name | Enter the name of your Azure storage container. This can be found in the Azure console on your storage account resource page under Data storage > Containers. (See the screenshot above.) |
| Container Prefix |
Optionally, enter the directory name within your container that you would like to use. For example, data-set-1 or data-set-1/subfolder-2.
|
| Account Name | Enter the name of your Azure storage account. (See the screenshot above.) |
| Account Key | Enter the access key for your Azure storage account This can be found in the Azure console on your storage account resource page under Security + networking > Access keys. (See the screenshot above.) |
| Can delete objects from storage | Enable this option if you want to delete annotations stored in the container when they are deleted in Label Studio. |
After adding the storage, click Sync.
Tip
You can also use the API to sync export storage.
Azure blob storage with Service Principal
You can use Azure Service Principal authentication to securely connect Label Studio Enterprise to Azure Blob Storage without using storage account access keys.
Service Principal authentication provides enhanced security through Entra (formerly “Azure Active Directory”) identity and access management, allowing for fine-grained permissions and audit capabilities.
Service Principal authentication uses Entra ID to authenticate applications. Unlike storage account keys that provide full access to the storage account, Service Principal authentication allows you to grant specific permissions and can be easily revoked or rotated.
For more information, see Microsoft - Application and service principal objects in Microsoft Entra ID.
Prerequisites
- Azure subscription and a storage account
- Permission to create App Registrations and assign roles on the Storage Account
- A private container for your data (create one if needed)
Set up a Service Principal in Entra
Register an app in Entra
Open the Microsoft Entra admin center.
Select App registrations on the right and click New registration. See Register an application.
Provide a name and select the appropriate account type. You can leave the redirect URI blank.
Under Overview, copy the Application (client) ID and Directory (tenant) ID.
Under Certificates & secrets, add a new client secret.
Copy the Value field.
Grant the principal storage access in Azure
Return to the Azure portal and go to your storage account.
- From your storage account, select Access control (IAM) on the left.
- Select Add > Add role assignment.
- Use the search field to locate Storage Blob Data Contributor. Click the role to highlight it.
- Select the Members tab above.
- Select User, group, or service principal and then click Select members.
- Use the search field provided to locate the name of the app you created earlier and click Select
- Click Review + assign.
Create a container
- While still on the page for your storage account, click Data storage on the left.
- Select Containers
- If you do not have a container, create a new one with private access.
warning
If you plan to use pre-signed URLs, configure CORS on the Storage Account Blob service. See Set up CORS for Azure blob storage.
Required permissions
- For source storage:
Microsoft.Storage/storageAccounts/blobServices/containers/read.../containers/blobs/read
- For target storage:
.../containers/blobs/read.../containers/blobs/write.../containers/read.../containers/blobs/delete(optional)
These are included in the built-in Storage Blob Data Contributor role.
Create a source storage connection
From Label Studio, open your project and select Settings > Cloud Storage > Add Source Storage.
Select Azure Blob Storage with Service Principal and click Next.
Configure Connection
Complete the following fields and then click Test connection:
| Storage Title | Enter a name for the storage connection to appear in Label Studio. |
| Storage Name | Enter the name of your Azure storage account. |
| Container Name | Enter the name of a container within the Azure storage account. |
| Tenant ID | Specify the Directory (tenant) ID from your App Registration. |
| Client ID | Specify the Application (client) ID from your App Registration. |
| Client Secret | Specify the Value of the client secret you copied earlier. |
| Use pre-signed URLs / Proxy through the platform | Enable or disable pre-signed URLs. See more. |
| Expiration minutes | Adjust the counter for how many minutes the pre-signed URLs are valid. |
Import Settings & Preview
Complete the following fields and then click Load preview to ensure you are syncing the correct data:
| Bucket Prefix | Optionally, enter the folder name within the container that you would like to use. For example, data-set-1 or data-set-1/subfolder-2. |
| Import Method | Select whether you want create a task for each file in your container or whether you would like to use a JSON/JSONL/Parquet file to define the data for each task. |
| File Name Filter | Specify a regular expression to filter bucket objects. Use .* to collect all objects. |
| Scan all sub-folders | Enable this option to perform a recursive scan across subfolders within your container. |
Review & Confirm
If everything looks correct, click Save & Sync to sync immediately, or click Save to save your settings and sync later.
Tip
You can also use the API to sync import storage.
Create a target storage connection
From Label Studio, open your project and select Settings > Cloud Storage > Add Target Storage.
Select Azure Blob Storage with Service Principal and click Next.
Complete the following fields:
| Storage Title | Enter a name for the storage connection to appear in Label Studio. |
| Storage Name | Enter the name of your Azure storage account. |
| Container Name | Enter the name of a container within the Azure storage account. |
| Container Prefix | Optionally, enter the folder name within the container that you would like to use. For example, data-set-1 or data-set-1/subfolder-2. |
| Tenant ID | Specify the Directory (tenant) ID from your App Registration. |
| Client ID | Specify the Application (client) ID from your App Registration. |
| Client Secret | Specify the Value of the client secret you copied earlier. |
| Can delete objects from storage | Enable this option if you want to delete annotations stored in the bucket when they are deleted in Label Studio. Your credentials must include the ability to delete bucket objects. |
After adding, click Sync to push exports.
Tip
You can also use the API to sync export storage.
Validate and troubleshoot
- After adding the storage, the connection is checked. If it fails, verify:
- Tenant ID, Client ID, Client Secret values (no extra spaces; secret not expired)
- Storage account and container names (case-sensitive)
- Role assignment: App Registration has Storage Blob Data Contributor on the Storage Account
- CORS is set when using pre-signed URLs; try proxy mode if testing
Add storage with the Label Studio API
You can also use the API to programmatically create connections. See our API documentation.