Set up Amazon S3 cloud storage
You can connect your Amazon S3 bucket to Label Studio to retrieve labeling tasks or store completed annotations.
Source store allows you to import data from your cloud environment. See Source storage.
Target store allows you to automatically export annotations. See Target storage.
You can create one or both connection types.
Configure access to your S3 bucket
Before you begin, you must configure access and permissions for your data.
These steps assume that you’re using the same AWS role to manage both source and target storage with Label Studio. If you only use S3 for source storage, Label Studio does not need PUT access to the bucket.
1. Enable programmatic access to your bucket
See the Amazon Boto3 configuration documentation for more on how to set up access to your S3 bucket.
note
A session token is only required in case of temporary security credentials. See the AWS Identity and Access Management documentation on Requesting temporary security credentials.
2. Assign a role policy
Assign the following role policy to an account you set up to retrieve source tasks and store annotations in S3, replacing <your_bucket_name> with your bucket name:
{
    "Version": "2012-10-17",
    "Statement": [
        {
            "Sid": "VisualEditor1",
            "Effect": "Allow",
            "Action": [
                "s3:ListBucket",
                "s3:GetObject",
                "s3:PutObject",
                "s3:DeleteObject"
            ],
            "Resource": [
                "arn:aws:s3:::<your_bucket_name>",
                "arn:aws:s3:::<your_bucket_name>/*"
            ]
        }
    ]
}
note
"s3:PutObject" is only needed for target storage connections, and "s3:DeleteObject" is only needed for target storage connections where you want to allow deleted annotations in Label Studio to also be deleted in the target S3 bucket.
3. Configure CORS
Set up cross-origin resource sharing (CORS) access to your bucket, using a policy that allows GET access from the same host name as your Label Studio deployment. See Configuring cross-origin resource sharing (CORS) in the Amazon S3 User Guide.
note
This is only required if you are using pre-signed URLs. If you are using proxying, you do not have to configure CORS. For more information, see Pre-signed URLs vs Storage proxies.
Use or modify the following example:
[
    {
        "AllowedHeaders": [
            "*"
        ],
        "AllowedMethods": [
            "GET"
        ],
        "AllowedOrigins": [
            "*"
        ],
        "ExposeHeaders": [
            "x-amz-server-side-encryption",
            "x-amz-request-id",
            "x-amz-id-2"
        ],
        "MaxAgeSeconds": 3000
    }
]
Amazon S3
Before you begin:
- Review the information in Cloud storage for projects and Secure access to cloud storage.
- Configure access to your S3 bucket.
- Obtain your AWS access keys.
Create a source storage connection
From Label Studio, open your project and select Settings > Cloud Storage > Add Source Storage.
Select Amazon S3 and click Next.
Configure Connection
Complete the following fields and then click Test connection:
| Field | Description |
|---|---|
| Storage Title | Enter a name to identify the storage connection. |
| Bucket Name | Enter the name of your S3 bucket. |
| Region Name |
Enter the AWS region name. For example us-east-1.
|
| S3 Endpoint | Optionally, enter an S3 endpoint. This is useful if you want to override the default URL created by S3 to access your bucket. |
| Access Key ID | Enter the access key ID of the temporary security credentials for an AWS account with access to your S3 bucket. |
| Secret Access Key | Enter the secret key of the temporary security credentials for an AWS account with access to your S3 bucket. |
| Session Token | Optionally, enter a session token of the temporary security credentials for an AWS account with access to your S3 bucket. |
| Use pre-signed URLs (On) / Proxy through the platform (Off) |
This determines how data from your bucket is loaded:
For more information, see Pre-signed URLs vs Storage proxies. |
| Expire pre-signed URLs (minutes) | Control how long pre-signed URLs remain valid. |
Import Settings & Preview
Complete the following fields and then click Load preview to ensure you are syncing the correct data:
| Bucket Prefix | Optionally, enter the directory name within your bucket that you would like to use. For example, data-set-1 or data-set-1/subfolder-2. |
| Import Method | Select whether you want create a task for each file in your bucket or whether you would like to use a JSON/JSONL/Parquet file to define the data for each task. |
| File Name Filter | Specify a regular expression to filter bucket objects. Use .* to collect all objects. |
| Scan all sub-folders | Enable this option to perform a recursive scan across subfolders within your container. |
Review & Confirm
If everything looks correct, click Save & Sync to sync immediately, or click Save to save your settings and sync later.
Tip
You can also use the API to sync import storage.
Create a target storage connection
From Label Studio, open your project and select Settings > Cloud Storage > Add Target Storage.
Select Amazon S3 and click Next.
Complete the following fields:
| Storage Title | Enter a name to identify the storage connection. |
| Bucket Name | Enter the name of your S3 bucket. |
| Bucket Prefix |
Optionally, enter the directory name within your bucket that you would like to use. For example, data-set-1 or data-set-1/subfolder-2.
|
| Region Name |
Enter the AWS region name. For example us-east-1.
|
| S3 Endpoint | Optionally, enter an S3 endpoint. This is useful if you want to override the default URL created by S3 to access your bucket. |
| Access Key ID | Enter the access key ID of the temporary security credentials for an AWS account with access to your S3 bucket. |
| Secret Access Key | Enter the secret key of the temporary security credentials for an AWS account with access to your S3 bucket. |
| Session Token | Optionally, enter a session token of the temporary security credentials for an AWS account with access to your S3 bucket. |
| Can delete objects from storage | Enable this option if you want to delete annotations stored in the S3 bucket when they are deleted in Label Studio. The storage credentials associated with the bucket must include the ability to delete bucket objects. |
After adding the storage, click Sync.
Tip
You can also use the API to sync export storage.
Amazon S3 with IAM role
If you want to use a revocable method to grant Label Studio access to your Amazon S3 bucket, use an IAM role and its temporary security credentials instead of an access key ID and secret. This added layer of security is only available in Label Studio Enterprise.
Before you begin:
- Review the information in Cloud storage for projects and Secure access to cloud storage.
- Configure access to your S3 bucket.
Set up an IAM role in Amazon AWS
Notice for Label Studio Cloud users with IAM role policies created before April 7, 2025
As of April 7th 2025, new storage connections require an update to the AWS principal in your IAM role policy.
If you set up your IAM role prior to April 7th, 2025 and you have already been using it with Label Studio, you must add the following to your principal list before you can set up new storage connection in Label Studio projects:
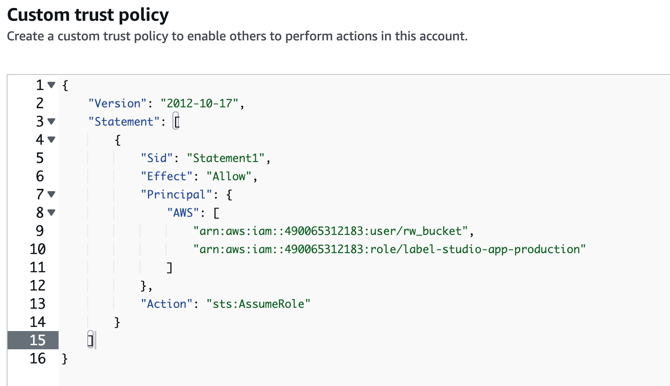
"arn:aws:iam::490065312183:role/label-studio-app-production"
For example:
(See step 3 below.)
Adding the new principal ensures you can create new connections.
Keeping the old principal ensures that pre-existing storage connections can continue to load data.
Existing S3 IAM role-based-access storages added to Label Studio will continue to work as is without any changes necessary.
This change is only required if you are setting up new connections.
Set up an IAM role in Amazon AWS to use with Label Studio.
From Label Studio, go to Organization page to retrieve your organization’s
External ID. You must be an Owner or Admin to view the Organization page.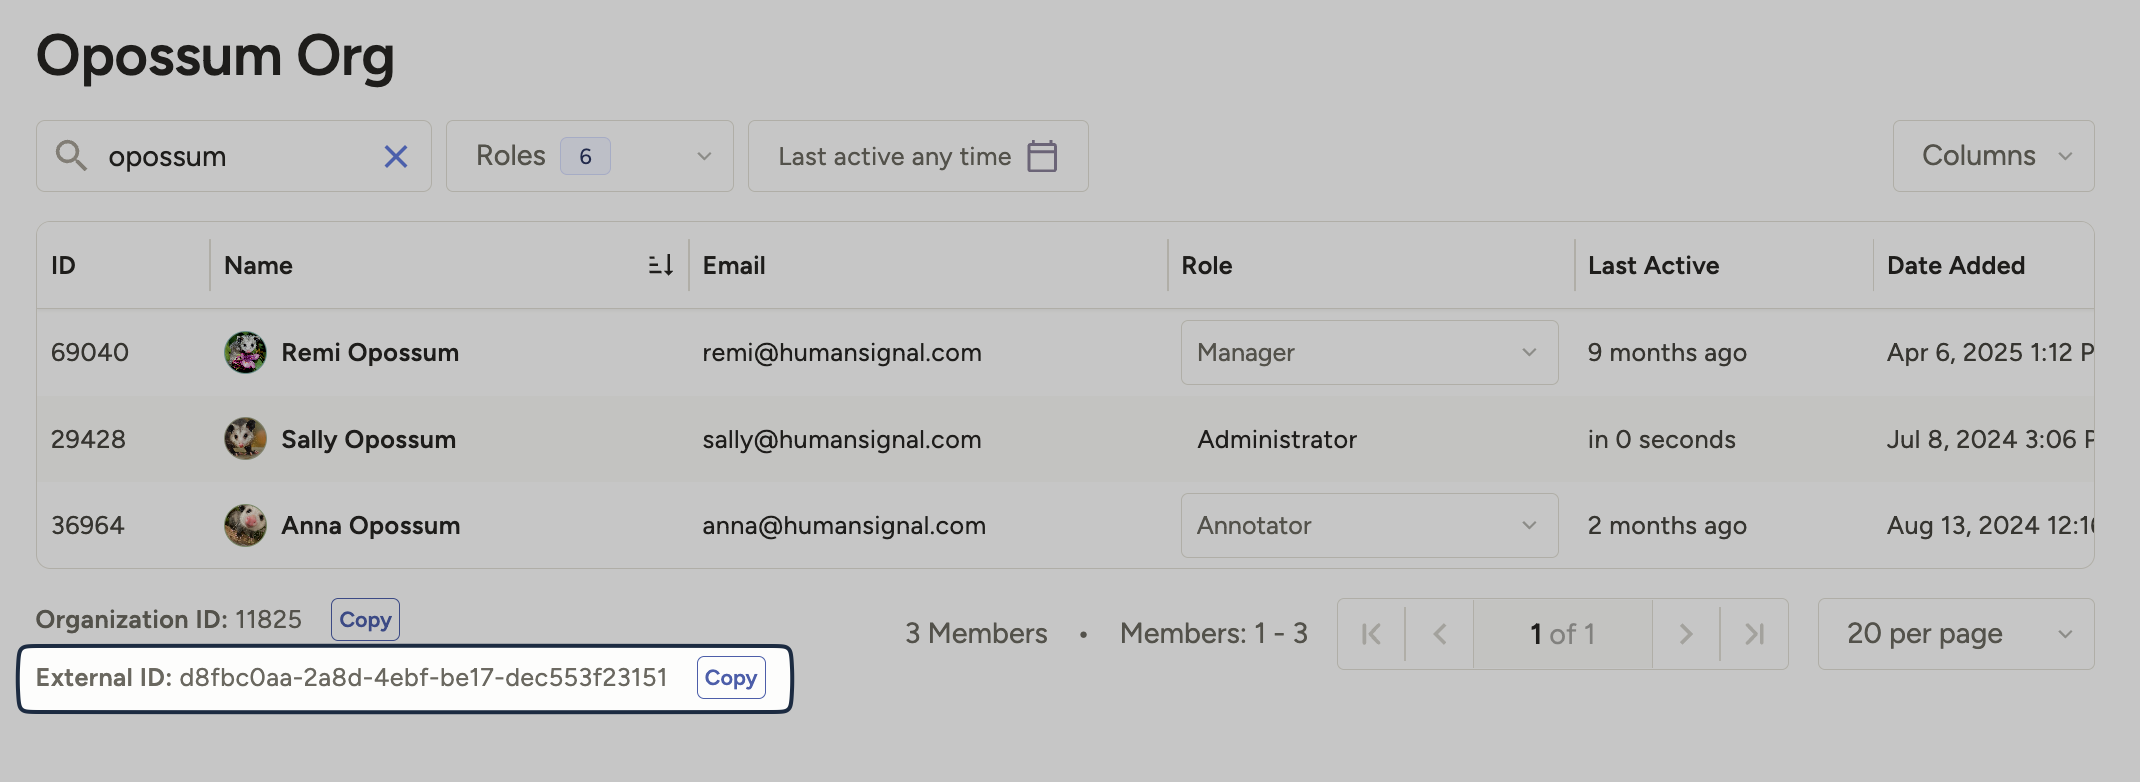
Follow the Amazon AWS documentation to create an IAM role in your AWS account.
Make sure to require an external ID and do not require multi-factor authentication when you set up the role. Select an existing permissions policy, or create one that allows programmatic access to the bucket.
Create a trust policy using the external ID. Use the following example:
{
  "Version": "2012-10-17",
  "Statement": [
    {
      "Effect": "Allow",
      "Principal": {
        "AWS": [
          "arn:aws:iam::490065312183:role/label-studio-app-production"
        ]
      },
      "Action": "sts:AssumeRole",
      "Condition": {
        "StringEquals": {
          "sts:ExternalId": [
            "<YOUR-ORG-ExternalId>"
          ]
        }
      }
    }
  ]
}
attention
If your bucket is already connected to a Label Studio project, and that connection was created before April 7, 2025, you will need to add the new role (listed above) along with your old user to continue using your existing project. You also must maintain the old role so that pre-existing projects can continue to load data from AWS.
- After you create the IAM role, note the Amazon Resource Name (ARN) of the role. You need it to set up the S3 source storage in Label Studio.
- Assign role policies to the role to allow it to access your S3 bucket. Replace
<your_bucket_name>with your S3 bucket name. Use the following role policy for S3 source storage:{ "Version": "2012-10-17", "Statement": [ { "Sid": "VisualEditor1", "Effect": "Allow", "Action": [ "s3:ListBucket", "s3:GetObject", ], "Resource": [ "arn:aws:s3:::<your_bucket_name>", "arn:aws:s3:::<your_bucket_name>/*" ] } ] }{ "Version": "2012-10-17", "Statement": [ { "Sid": "VisualEditor1", "Effect": "Allow", "Action": [ "s3:ListBucket", "s3:PutObject", "s3:GetObject", "s3:DeleteObject" ], "Resource": [ "arn:aws:s3:::<your_bucket_name>", "arn:aws:s3:::<your_bucket_name>/*" ] } ] }
note
"s3:DeleteObject" is only needed for target storage connections where you want deleted annotations in Label Studio to also be deleted in the target S3 bucket.
For more details about using an IAM role with an external ID to provide access to a third party (Label Studio), see the Amazon AWS documentation How to use an external ID when granting access to your AWS resources to a third party.
Create a source storage connection
From Label Studio, open your project and select Settings > Cloud Storage > Add Source Storage.
Select Amazon S3 with IAM Role and click Next.
Configure Connection
Complete the following fields and then click Test connection:
| Field | Description |
|---|---|
| Storage Title | Enter a name to identify the storage connection. |
| Bucket Name | Enter the name of your S3 bucket. |
| Region Name |
Enter the AWS region name. For example us-east-1.
|
| S3 Endpoint | Optionally, enter an S3 endpoint. This is useful if you want to override the default URL created by S3 to access your bucket. |
| Role ARN | Enter the Amazon Resource Name (ARN) of the IAM role that you created earlier to grant access to Label Studio. |
| Use pre-signed URLs (On) / Proxy through the platform (Off) |
This determines how data from your bucket is loaded:
For more information, see Pre-signed URLs vs Storage proxies. |
| Expire pre-signed URLs (minutes) | Control how long pre-signed URLs remain valid. |
Import Settings & Preview
Complete the following fields and then click Load preview to ensure you are syncing the correct data:
| Bucket Prefix | Optionally, enter the directory name within your bucket that you would like to use. For example, data-set-1 or data-set-1/subfolder-2. |
| Import Method | Select whether you want create a task for each file in your bucket or whether you would like to use a JSON/JSONL/Parquet file to define the data for each task. |
| File Name Filter | Specify a regular expression to filter bucket objects. Use .* to collect all objects. |
| Scan all sub-folders | Enable this option to perform a recursive scan across subfolders within your container. |
Review & Confirm
If everything looks correct, click Save & Sync to sync immediately, or click Save to save your settings and sync later.
Tip
You can also use the API to sync import storage.
Create a target storage connection
From Label Studio, open your project and select Settings > Cloud Storage > Add Target Storage.
Select Amazon S3 with IAM Role and complete the following fields:
| Storage Title | Enter a name to identify the storage connection. |
| Bucket Name | Enter the name of your S3 bucket. |
| Bucket Prefix |
Optionally, enter the directory name within your bucket that you would like to use. For example, data-set-1 or data-set-1/subfolder-2.
|
| Region Name |
Enter the AWS region name. For example us-east-1.
|
| S3 Endpoint | Optionally, enter an S3 endpoint. This is useful if you want to override the default URL created by S3 to access your bucket. |
| Role ARN | Enter the Amazon Resource Name (ARN) of the IAM role that you created to grant access to Label Studio. |
| Can delete objects from storage | Enable this option if you want to delete annotations stored in the S3 bucket when they are deleted in Label Studio. The storage credentials associated with the bucket must include the ability to delete bucket objects. |
After adding the storage, click Sync.
Tip
You can also use the API to sync export storage.
Add storage with the Label Studio API
You can also use the API to programmatically create connections. See our API documentation.
IP filtering and VPN for enhanced security for S3 storage
To maximize security and data isolation behind a VPC, restrict access to the Label Studio backend and internal network users by setting IP restrictions for storage, allowing only trusted networks to perform task synchronization and generate pre-signed URLs. Additionally, establish a secure connection between storage and users’ browsers by configuring a VPC private endpoint or limiting storage access to specific IPs or VPCs.
Read more about Source storage behind your VPC.
Bucket Policy Example for S3 storage
warning
These example bucket policies explicitly deny access to any requests outside the allowed IP addresses. Even the user that entered the bucket policy can be denied access to the bucket if the user doesn't meet the conditions. Therefore, make sure to review the bucket policy carefully before saving it. If you get accidentally locked out, see How to regain access to an Amazon S3 bucket.
Helpful Resources:
Go to your S3 bucket and then Permissions > Bucket Policy in the AWS management console. Add the following policy:
{
    "Version": "2012-10-17",
    "Statement": [
        {
            "Sid": "DenyAccessUnlessFromSaaSIPsForListAndGet",
            "Effect": "Deny",
            "Principal": {
                "AWS": "arn:aws:iam::490065312183:role/label-studio-app-production"
            },
            "Action": [
                "s3:ListBucket",
                "s3:GetObject"
            ],
            "Resource": [
                "arn:aws:s3:::YOUR_BUCKET_NAME",
                "arn:aws:s3:::YOUR_BUCKET_NAME/*"
            ],
            "Condition": {
                "NotIpAddress": {
                    "aws:SourceIp": [
                      //// IP ranges for app.humansignal.com from the documentation
                        "x.x.x.x/32",
                        "x.x.x.x/32",
                        "x.x.x.x/32"
                    ]
                }
            }
        },
//// Optional
        {
            "Sid": "DenyAccessUnlessFromVPNForGetObject",
            "Effect": "Deny",
            "Principal": "*",
            "Action": "s3:GetObject",
            "Resource": "arn:aws:s3:::YOUR_BUCKET_NAME/*",
            "Condition": {
                "NotIpAddress": {
                    "aws:SourceIp": "YOUR_VPN_SUBNET/32"
                }
            }
        }
    ]
}