Set up Databricks UC volume storage
Connect Label Studio Enterprise to Databricks Unity Catalog (UC) Volumes to import files as tasks and export annotations as JSON back to your volumes. This connector uses the Databricks Files API and operates only in proxy mode (presigned URLs are not supported by Databricks).
Prerequisites
A Databricks workspace URL (Workspace Host), for example
https://adb-12345678901234.1.databricks.com(or Azure domain).See Create a workspace and Get identifiers for workspace objects.
One of the following, all must have permissions to access the Files API:
A Databricks Personal Access Token (PAT)
A Databricks Service Principal
An Azure AD Service Principal for Azure Databricks
See Authentication options below.
A UC Volume path under
/Volumes/<catalog>/<schema>/<volume>with files you want to label.Proxying must be enabled for your organization (Organization > Usage & License > Features).
Before you begin, review the information in Cloud storage for projects and Secure access to cloud storage.
Authentication options
PAT (Personal Access Token)
Traditional authentication using a long-lived token created in the Databricks workspace UI
- Pros: Simple to set up, works everywhere, does not require a paid account
- Cons: Long-lived credential, tied to user account
- Best for: Development, testing, personal projects
Generate a PAT
You can generate tokens from your Databricks workspace under Account > Settings > Developer > Access tokens. See Databricks personal access token authentication.
When configuring storage in Label Studio, you will be asked for your access token.
Databricks Service Principal
This is an OAuth-based authentication using a service principal created in the Databricks Account Console. Works on all cloud platforms (AWS, GCP, Azure).
- Pros: Not tied to user account, OAuth tokens auto-refresh
- Cons: Requires Databricks Account Console access (not available on the free tier)
- Best for: Production workloads, automation, CI/CD
- Token endpoint:
{workspace_host}/oidc/v1/token
Set up Service Principal authentication
- Go to the Databricks Account Console and select User management > Service principals > Add service principal.
- Generate an OAuth secret under the service principal settings (Secrets > Generate secret).
- Save the
client_idand generated secret. - Assign the service principal to your workspace.
See Manage service principals and Authorize service principal access to Databricks with OAuth.
When configuring storage in Label Studio, you will be asked for the following:
- Client ID–This is the Application ID for your service principal.
- Client Secret–This is the client secret you generated after creating your service principal.
note
For Service Principal authentication, Label Studio automatically acquires and refreshes OAuth access tokens (~1 hour lifetime). No manual token rotation needed.
Microsoft Entra Service Principal for Azure Databricks
OAuth-based authentication using an Entra app registration.
Azure Databricks only.
- Pros: Integrates with Azure identity management, OAuth tokens auto-refresh
- Cons: Azure-only, requires Entra configuration, requires Databricks Account Console access (not available on the free tier)
- Best for: Azure environments with centralized identity management
- Token endpoint:
https://login.microsoftonline.com/{tenant_id}/oauth2/v2.0/token
Set up Service Principal authentication
- Open the Microsoft Entra admin center.
- Select App registrations on the right and click New registration. See Register an application.
- Under Overview, note Application (client) ID and Directory (tenant) ID.
- Under Certificates & secrets, add a new client secret.
- Go to the Databricks Account Console and select User management > Service principals > Add service principal.
- Enter the Application ID from Entra.
- Assign the service principal to your workspace.
For more information, see Authorize service principal access to Azure Databricks with OAuth.
When configuring storage in Label Studio, you will be asked for the following:
- Azure Tenant ID–This is the Directory (tenant) ID available from the Overview page of your app registration.
- Client ID–This is the Application (client) ID available from the Overview page of your app registration.
- Client Secret–This is the client secret you generated after registering your application.
note
For Service Principal authentication, Label Studio automatically acquires and refreshes OAuth access tokens (~1 hour lifetime). No manual token rotation needed.
Create a source storage connection
From Label Studio, open your project and select Settings > Cloud Storage > Add Source Storage.
Select Databricks Files (UC Volumes) and click Next.
Configure Connection
Complete the following fields and then click Test connection:
| Storage Title | Enter a name for the storage connection to appear in Label Studio. |
| Workspace Host | Enter your workspace URL, for example https://<workspace-identifier>.cloud.databricks.com |
| Authentication Method | Select an authentication method and then enter the required information. See Authentication options above. |
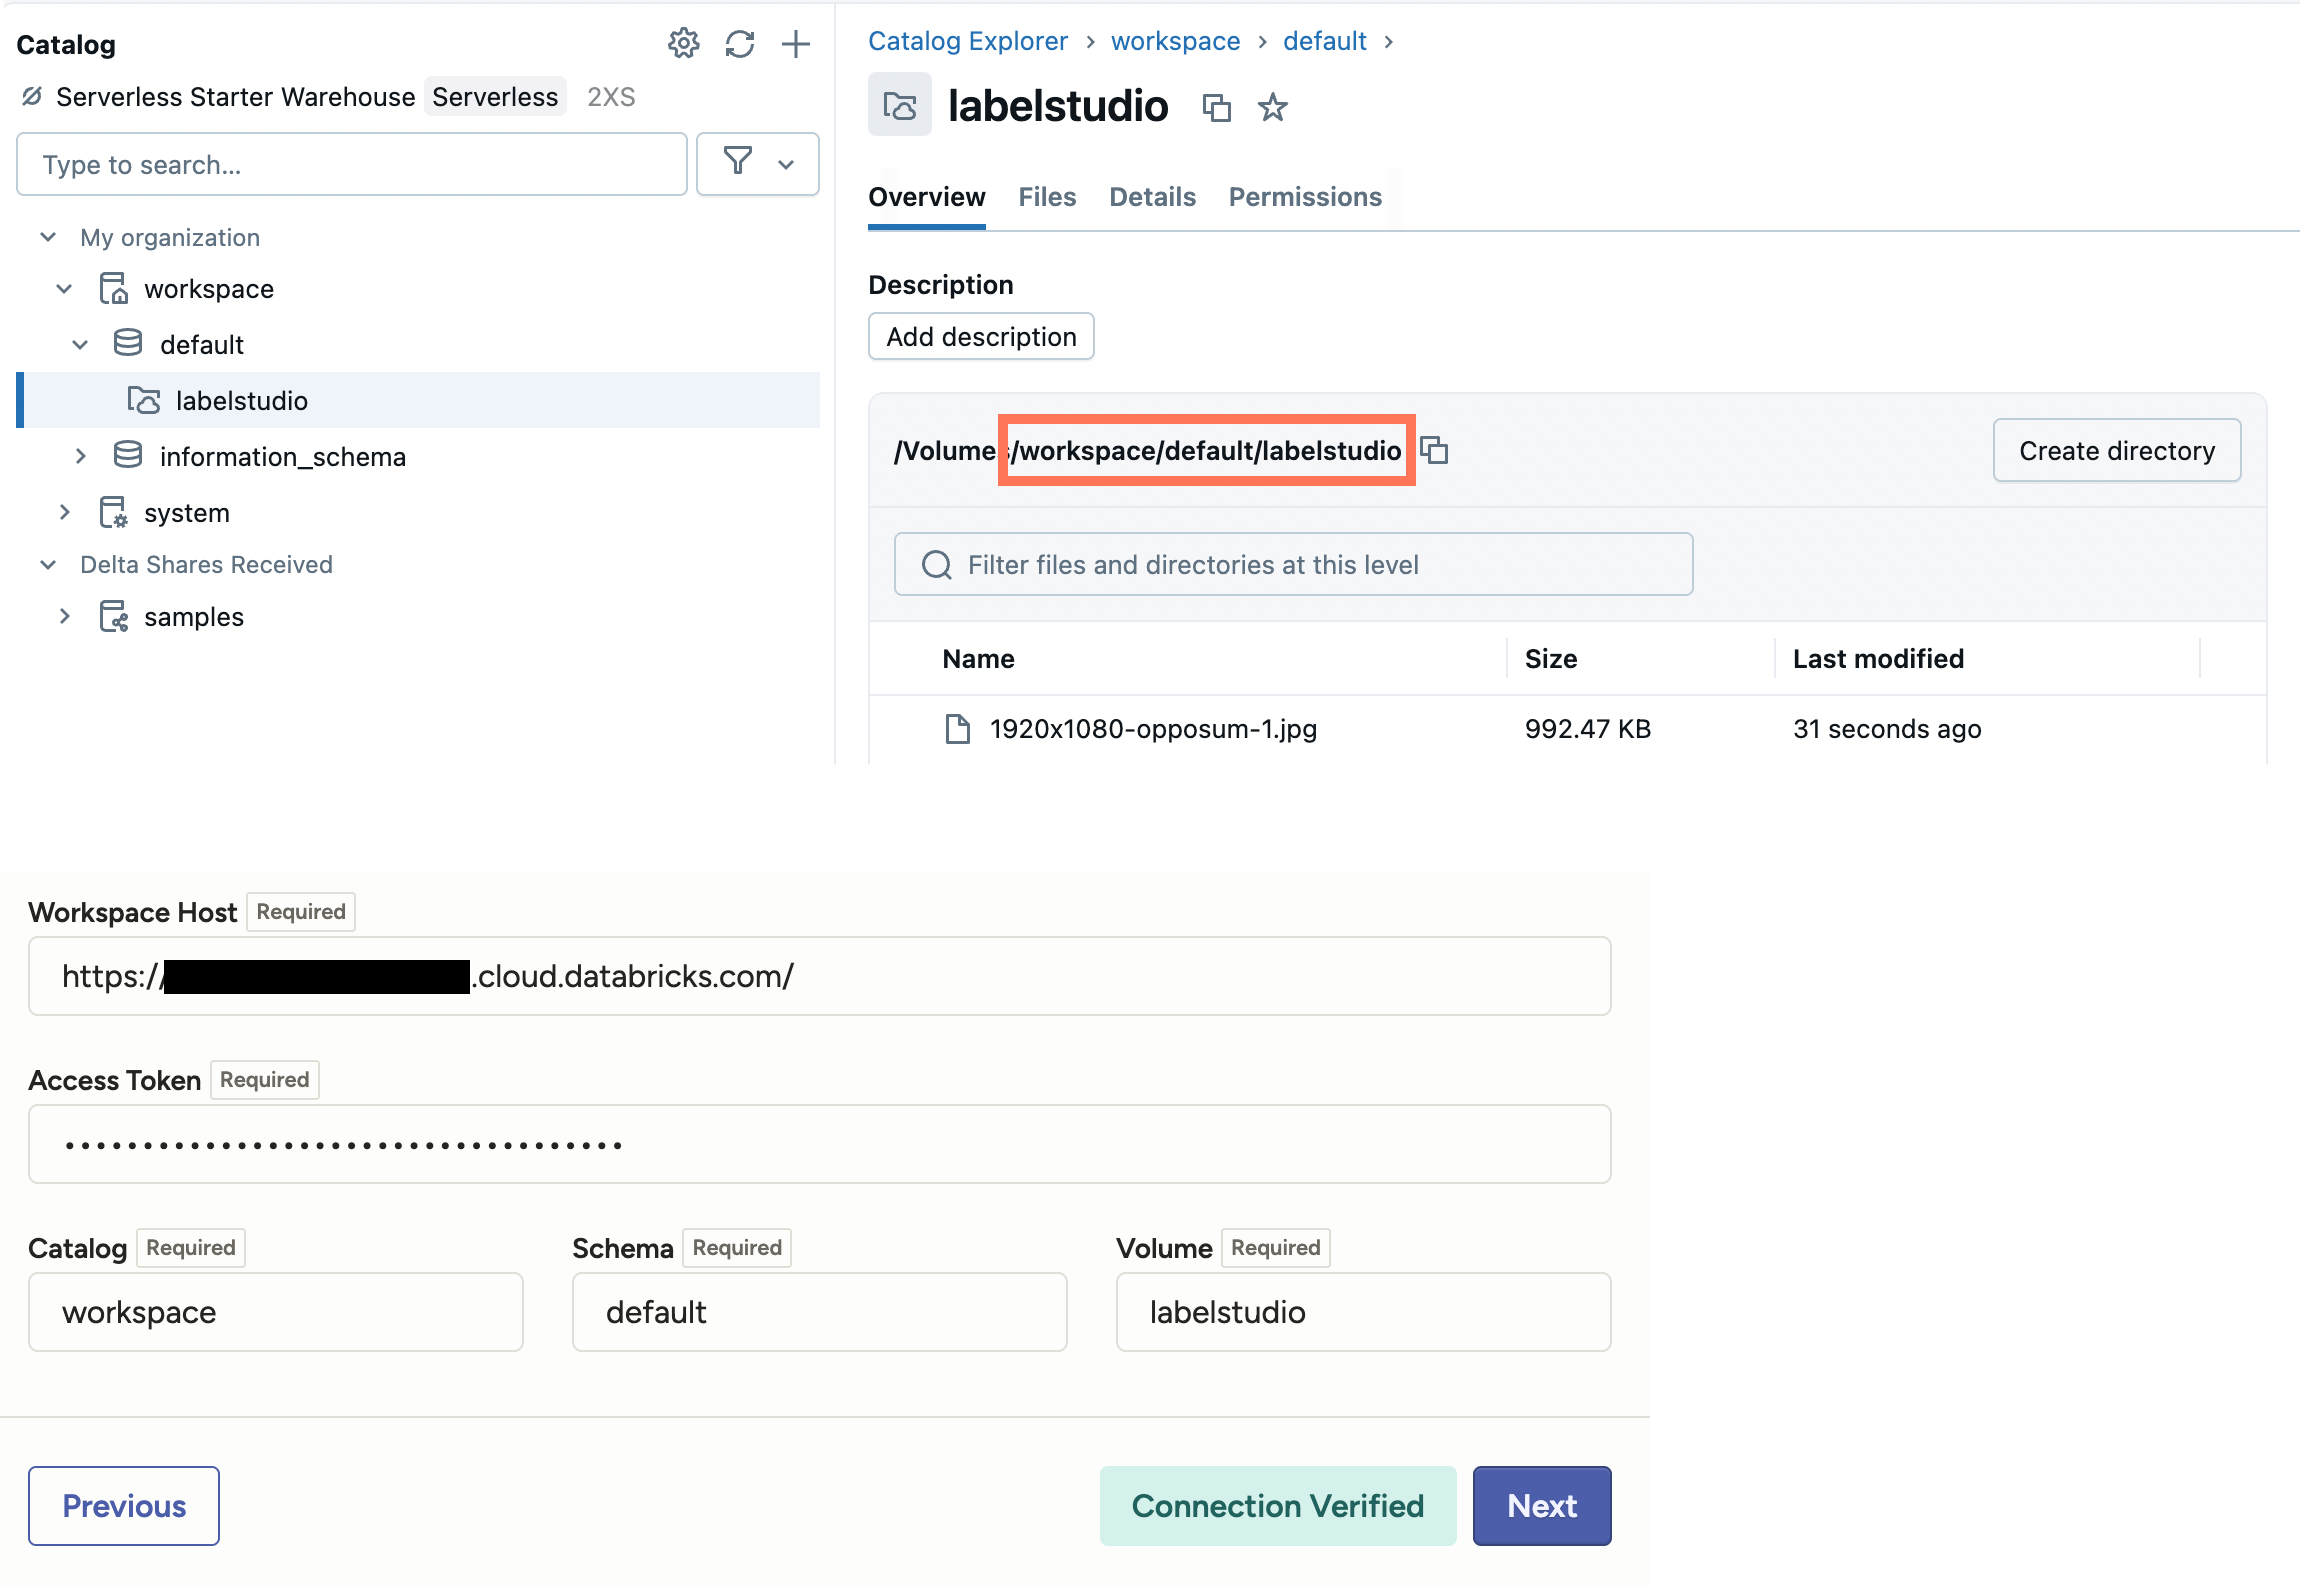
| Catalog Schema Volume |
Specify your volume path (UC coordinates). You can find this from the Catalog Explorer in Databricks (see screenshot below). |
Import Settings & Preview
Complete the following fields and then click Load preview to ensure you are syncing the correct data:
| Bucket Prefix | Optionally, enter the directory name within the volume that you would like to use. For example, data-set-1 or data-set-1/subfolder-2. |
| Import Method | Select whether you want create a task for each file in your container or whether you would like to use a JSON/JSONL/Parquet file to define the data for each task. |
| File Name Filter | Specify a regular expression to filter bucket objects. Use .* to collect all objects. |
| Scan all sub-folders | Enable this option to perform a recursive scan across subfolders within your container. |
Review & Confirm
If everything looks correct, click Save & Sync to sync immediately, or click Save to save your settings and sync later.
Tip
You can also use the API to sync import storage.
URI schema
To reference Databricks files directly in task JSON (without using source storage), use Label Studio’s Databricks URI scheme:
dbx://Volumes/<catalog>/<schema>/<volume>/<path>
Example:
{ "image": "dbx://Volumes/main/default/dataset/images/1.jpg" }
Troubleshooting
- If your file preview returns zero files, verify the path under
/Volumes/<catalog>/<schema>/<volume>/<prefix?>and your permissions. - Ensure the Workspace Host has no trailing slash and matches your workspace domain.
- If previews work but media fails to load, confirm proxy mode is allowed for your organization in Label Studio (Organization > Usage & License > Features) and network egress allows Label Studio to reach Databricks.
Proxy and security
This connector streams data through the Label Studio backend with HTTP Range support. Databricks does not support presigned URLs, so this option is also not available in Label Studio.
Create a target storage connection
Repeat the steps from the previous section but using Add Target Storage. Use the same workspace host, token, and volume path (UC coordinates).
For your Bucket Prefix, set an export folder to use (e.g., exports/${project_id}) and determine whether you want to allow files to be deleted from target storage.
When file deletion is enabled, if you delete an annotation in Label Studio (via UI or API), Label Studio will also delete the corresponding exported JSON file from your target storage for this storage connection.
Note that this only affects files that were exported by that target storage, not your source media or tasks. Your PAT or SP permissions must also allow deletion.
After adding, click Sync to export annotations as JSON files to your target volume.
Tip
You can also use the API to sync export storage.
Add storage with the Label Studio API
You can also use the API to programmatically create connections. See our API documentation..