Set up Google Cloud Storage
Dynamically import tasks and export annotations to Google Cloud Storage (GCS) buckets in Label Studio. For details about how Label Studio secures access to cloud storage, see Secure access to cloud storage.
Configure access to your Google Cloud Storage bucket
First, review the information in Cloud storage for projects and Secure access to cloud storage.
Then you will need to complete the following prerequisites:
1. Enable programmatic access to your bucket
See Cloud Storage Client Libraries in the Google Cloud Storage documentation for how to set up access to your GCS bucket.
2. Set up authentication to your bucket
Your account must have the Service Account Token Creator and Storage Object Viewer roles and storage.buckets.get access permission. See Setting up authentication and IAM permissions for Cloud Storage in the Google Cloud Storage documentation.
note
If you are using WIF, see Service account permissions below.
3. Configure CORS
Set up cross-origin resource sharing (CORS) access to your bucket, using a policy that allows GET access from the same host name as your Label Studio deployment. See Configuring cross-origin resource sharing (CORS) in the Google Cloud User Guide.
note
This is only required if you are using pre-signed URLs. If you are using proxying, you do not have to configure CORS. For more information, see Pre-signed URLs vs Storage proxies.
Use or modify the following example:
echo '[
   {
      "origin": ["*"],
      "method": ["GET"],
      "responseHeader": ["Content-Type","Access-Control-Allow-Origin"],
      "maxAgeSeconds": 3600
   }
]' > cors-config.json
Replace YOUR_BUCKET_NAME with your actual bucket name in the following command to update CORS for your bucket:
gsutil cors set cors-config.json gs://YOUR_BUCKET_NAMEGoogle Cloud Storage
Before you begin:
- Review the information in Cloud storage for projects and Secure access to cloud storage.
- Configure access to your bucket.
Google Application Credentials
You will need to provide Google Application Credentials. These will be a JSON file that you input while setting up your storage.
- From the Google Cloud Console, go to IAM & Admin > Service Accounts.
- Select the specific service account you need credentials for. If you don’t have one, create a new one.
- In the service account details, go to the Keys tab and click Add Key > Create new key.
- Select the JSON key type and click Create. The JSON file will be generated and automatically downloaded to your computer.
See also:
note
If you're using a service account to authorize access to the Google Cloud Platform, make sure to activate it. See gcloud auth activate-service-account.
Create a source storage connection
From Label Studio, open your project and select Settings > Cloud Storage > Add Source Storage.
Select Google Cloud Storage and click Next.
Configure Connection
Complete the following fields and then click Test connection:
| Field | Description |
|---|---|
| Storage Title | Enter a name to identify the storage connection. |
| Bucket Name | Enter the name of your GCS bucket. |
| Google Application Credentials |
Enter the JSON file with the GCS credentials you created to manage authentication for your bucket. On-prem users: Alternatively, you can use the GOOGLE_APPLICATION_CREDENTIALS environment variable and/or set up Application Default Credentials, so that users do not need to configure credentials manually. See Application Default Credentials for enhanced security below. |
| Google Project ID |
Enter the ID of your Google project in which the bucket is located (for example, my-label-studio-project). If you're unsure, you can find this in Google Cloud Console under IAM & Admin > Settings. |
| Use pre-signed URLs (On) / Proxy through the platform (Off) |
This determines how data from your bucket is loaded:
For more information, see Pre-signed URLs vs Storage proxies. |
| Expire pre-signed URLs (minutes) | Control how long pre-signed URLs remain valid. |
Import Settings & Preview
Complete the following fields and then click Load preview to ensure you are syncing the correct data:
| Bucket Prefix | Optionally, enter the directory name within your bucket that you would like to use. For example, data-set-1 or data-set-1/subfolder-2. |
| Import Method | Select whether you want create a task for each file in your bucket or whether you would like to use a JSON/JSONL/Parquet file to define the data for each task. |
| File Name Filter | Specify a regular expression to filter bucket objects. Use .* to collect all objects. |
| Scan all sub-folders | Enable this option to perform a recursive scan across subfolders within your container. |
Review & Confirm
If everything looks correct, click Save & Sync to sync immediately, or click Save to save your settings and sync later.
Tip
You can also use the API to sync import storage.
Create a target storage connection
From Label Studio, open your project and select Settings > Cloud Storage > Add Target Storage.
Select Google Cloud Storage and click Next.
Complete the following fields:
| Storage Title | Enter a name to identify the storage connection. |
| Bucket Name | Enter the name of your GCS bucket. |
| Bucket Prefix |
Optionally, enter the directory name within your bucket that you would like to use. For example, data-set-1 or data-set-1/subfolder-2.
|
| Google Application Credentials |
Enter the JSON file with the GCS credentials you created to manage authentication for your bucket. On-prem users: Alternatively, you can use the GOOGLE_APPLICATION_CREDENTIALS environment variable and/or set up Application Default Credentials, so that users do not need to configure credentials manually. See Application Default Credentials for enhanced security below. |
| Google Project ID |
Enter the ID of your Google project in which the bucket is located (for example, my-label-studio-project). If you're unsure, you can find this in Google Cloud Console under IAM & Admin > Settings. |
| Can delete objects from storage | Enable this option if you want to delete annotations stored in the bucket when they are deleted in Label Studio. Your credentials must include the ability to delete bucket objects. |
After adding the storage, click Sync.
Tip
You can also use the API to sync export storage.
Application Default Credentials for enhanced security for GCS
If you use Label Studio on-premises with Google Cloud Storage, you can set up Application Default Credentials to provide cloud storage authentication globally for all projects, so users do not need to configure credentials manually.
The recommended way to to do this is by using the GOOGLE_APPLICATION_CREDENTIALS environment variable. For example:
export GOOGLE_APPLICATION_CREDENTIALS=json-file-with-GCP-creds-23441-8f8sd99vsd115a.jsonGoogle Cloud Storage with Workload Identity Federation (WIF)
You can also use Workload Identity Federation (WIF) pools with Google Cloud Storage.
Unlike with application credentials, WIF allows you to use temporary credentials. Each time you make a request to GCS, Label Studio connects to your identity pool to request temporary credentials.
For more information about WIF, see Google Cloud - Workload Identity Federation.
Before you begin:
- Review the information in Cloud storage for projects and Secure access to cloud storage.
- Configure access to your bucket.
Service account permissions
You will need a service account that has the following permissions
- Bucket: Storage Admin (
roles/storage.admin) - Project: Service Account Token Creator (
roles/iam.serviceAccountTokenCreator) - Project: Storage Object Viewer (
roles/storage.viewer)
See Create service accounts in the Google Cloud documentation.
Create a Workload Identity Pool
There are several methods you can use to create a WIF pool.
Using Terraform
An example script is provided below. Ensure all required variables are set:
GCP project variables:
var.gcp_project_namevar.gcp_region
SaaS provided by HumanSignal:
var.aws_account_id=490065312183var.aws_role_name=label-studio-app-production
Then run:
terraform init
terraform plan
terraform apply
Once applied, you will have a functioning Workload Identity Pool that trusts the Label Studio AWS IAM Role.
## Variables
/* AWS variables are so that AWS-hosted Label Studio resources can reach out to request credentials */

variable "gcp_project_name" {
  type        = string
  description = "GCP Project name"
}

variable "gcp_region" {
  type        = string
  description = "GCP Region"
}

variable "label_studio_gcp_sa_name" {
  type        = string
  description = "GCP Label Studio Service Account Name"
}

variable "aws_account_id" {
  type        = string
  description = "AWS Project ID"
}

variable "aws_role_name" {
  type        = string
  description = "AWS Role name"
}

variable "external_ids" {
  type        = list(string)
  default = []
  description = "List of external ids"
}

## Outputs

output "GCP_WORKLOAD_ID" {
  value = google_iam_workload_identity_pool_provider.label-studio-provider-jwt.workload_identity_pool_id
}

output "GCP_WORKLOAD_PROVIDER" {
  value = google_iam_workload_identity_pool_provider.label-studio-provider-jwt.workload_identity_pool_provider_id
}

## Main

provider "google" {
  project = var.gcp_project_name
  region  = var.gcp_region
}

resource "random_id" "random" {
  byte_length = 4
}

locals {
  aws_assumed_role = "arn:aws:sts::${var.aws_account_id}:assumed-role/${var.aws_role_name}"

  external_id_condition = (
    length(var.external_ids) > 0
    ? format("(attribute.aws_role == \"%s\") && (attribute.external_id in [%s])",
      local.aws_assumed_role,
      join(", ", formatlist("\"%s\"", var.external_ids))
    )
    : format("(attribute.aws_role == \"%s\")", local.aws_assumed_role)
  )
}

resource "google_iam_workload_identity_pool" "label-studio-pool" {
  workload_identity_pool_id = "label-studio-pool-${random_id.random.hex}"
  project                   = var.gcp_project_name
}

resource "google_iam_workload_identity_pool_provider" "label-studio-provider-jwt" {
  workload_identity_pool_id          = google_iam_workload_identity_pool.label-studio-pool.workload_identity_pool_id
  workload_identity_pool_provider_id = "label-studio-jwt-${random_id.random.hex}"

  attribute_condition = local.external_id_condition

  attribute_mapping = {
    "google.subject"        = "assertion.arn"
    "attribute.aws_account" = "assertion.account"
    "attribute.aws_role"    = "assertion.arn.contains('assumed-role') ? assertion.arn.extract('{account_arn}assumed-role/') + 'assumed-role/' + assertion.arn.extract('assumed-role/{role_name}/') : assertion.arn"
    "attribute.external_id" = "assertion.external_id"
  }

  aws {
    account_id = var.aws_account_id
  }
}

data "google_service_account" "existing_sa" {
  account_id = var.label_studio_gcp_sa_name
}

resource "google_service_account_iam_binding" "label-studio-sa-oidc" {
  service_account_id = data.google_service_account.existing_sa.name
  role               = "roles/iam.workloadIdentityUser"

  members = [
    "principalSet://iam.googleapis.com/${google_iam_workload_identity_pool.label-studio-pool.name}/attribute.aws_role/${local.aws_assumed_role}"
  ]
}
Using the gcloud command line
Replace the bracketed variables ([PROJECT_ID], [POOL_ID], [PROVIDER_ID], etc.) with your own values.
Make sure you escape quotes or use single quotes when necessary.
Create the Workload Identity pool:
 gcloud iam workload-identity-pools create [POOL_ID] \
--project=[PROJECT_ID] \
--location="global" \
--display-name="[POOL_DISPLAY_NAME]"
Where:
[POOL_ID]is the ID that you want to assign to your WIF pool (for example,label-studio-pool-abc123). Note this because you will need to reuse it later.[PROJECT_ID]is the ID of your Google Cloud project.[POOL_DISPLAY_NAME]is a human-readable name for your pool (optional, but recommended).
Create the provider for AWS.
This allows AWS principals that have the correct external ID and AWS role configured to impersonate the Google Cloud service account. This is necessary because the Label Studio resources making the request are hosted in AWS.
gcloud iam workload-identity-pools providers create-aws [PROVIDER_ID] \
--workload-identity-pool="[POOL_ID]" \
--account-id="490065312183" \
--attribute-condition="attribute.aws_role==\"arn:aws:sts::490065312183:assumed-role/label-studio-app-production\"" \
--attribute-mapping="google.subject=assertion.arn,attribute.aws_account=assertion.account,attribute.aws_role=assertion.arn,attribute.external_id=assertion.external_id"
Where:
[PROVIDER_ID]is a provider ID (for example,label-studio-app-production).[POOL_ID]: The pool ID you provided in step 1.
Grant the service account that you created earlier the
iam.workloadIdentityUserrole.gcloud iam service-accounts add-iam-policy-binding [SERVICE_ACCOUNT_EMAIL] \ --role="roles/iam.workloadIdentityUser" \ --member="principalSet://iam.googleapis.com/projects/[PROJECT_NUMBER]/locations/global/workloadIdentityPools/[POOL_ID]/attribute.aws_role/arn:aws:sts::490065312183:assumed-role/label-studio-app-production"Where:
[SERVICE_ACCOUNT_EMAIL]is the email associated with you GCS service account (for example,my-service-account@[PROJECT_ID].iam.gserviceaccount.com).[PROJECT_NUMBER]: Your Google project number. This is different than the project ID. You can find the project number with the following command:gcloud projects describe $PROJECT_ID --format="value(projectNumber)"[POOL_ID]: The pool ID you provided in step 1.
Before setting up your connection in Label Studio, note what you provided for the following variables (you will be asked to provide them):
[POOL_ID][PROVIDER_ID][SERVICE_ACCOUNT_EMAIL][PROJECT_NUMBER][PROJECT_ID]
Using the Google Cloud Console
Before you begin, ensure you are in the correct project:

From the Google Cloud Console, navigate to IAM & Admin > Workload Identity Pools.
Click Get Started to enable the APIs.
Under Create an identity pool, complete the following fields:
- Name: This is the pool ID (for example,
label-studio-pool-abc123). Note this ID because you will need it again later. - Description: This is the display name for the pool (for example, “Label Studio Pool”).
- Name: This is the pool ID (for example,
Under Add a provider pool, complete the following fields:
- Select a provider: Select AWS. This is the location where the Label Studio components responsible for issuing requests are stored.
- Provider name: Enter
Label Studio App Production(you can use a different display name, but you need to ensure that the corresponding provider ID is stilllabel-studio-app-production) - Provider ID: Enter
label-studio-app-production. - AWS Account ID: Enter
490065312183.
Under Configure provider attributes, enter the following:
Click Add condition and then enter the following:
attribute.aws_role=="arn:aws:sts::490065312183:assumed-role/label-studio-app-production"Click Edit mapping and then add the following:
google.subject = assertion.arnattribute.aws_role = assertion.arn.contains('assumed-role') ? assertion.arn.extract('{account_arn}assumed-role/') + 'assumed-role/' + assertion.arn.extract('assumed-role/{role_name}/') : assertion.arn(this might be filled in by default)attribute.aws_account = assertion.accountattribute.external_id = assertion.external_id
Click Save.
Go to IAM & Admin > Service Accounts and find the service account you want to allow AWS (Label Studio) to impersonate. See Service account permissions above.
From the Principals with access tab, click Grant Access.
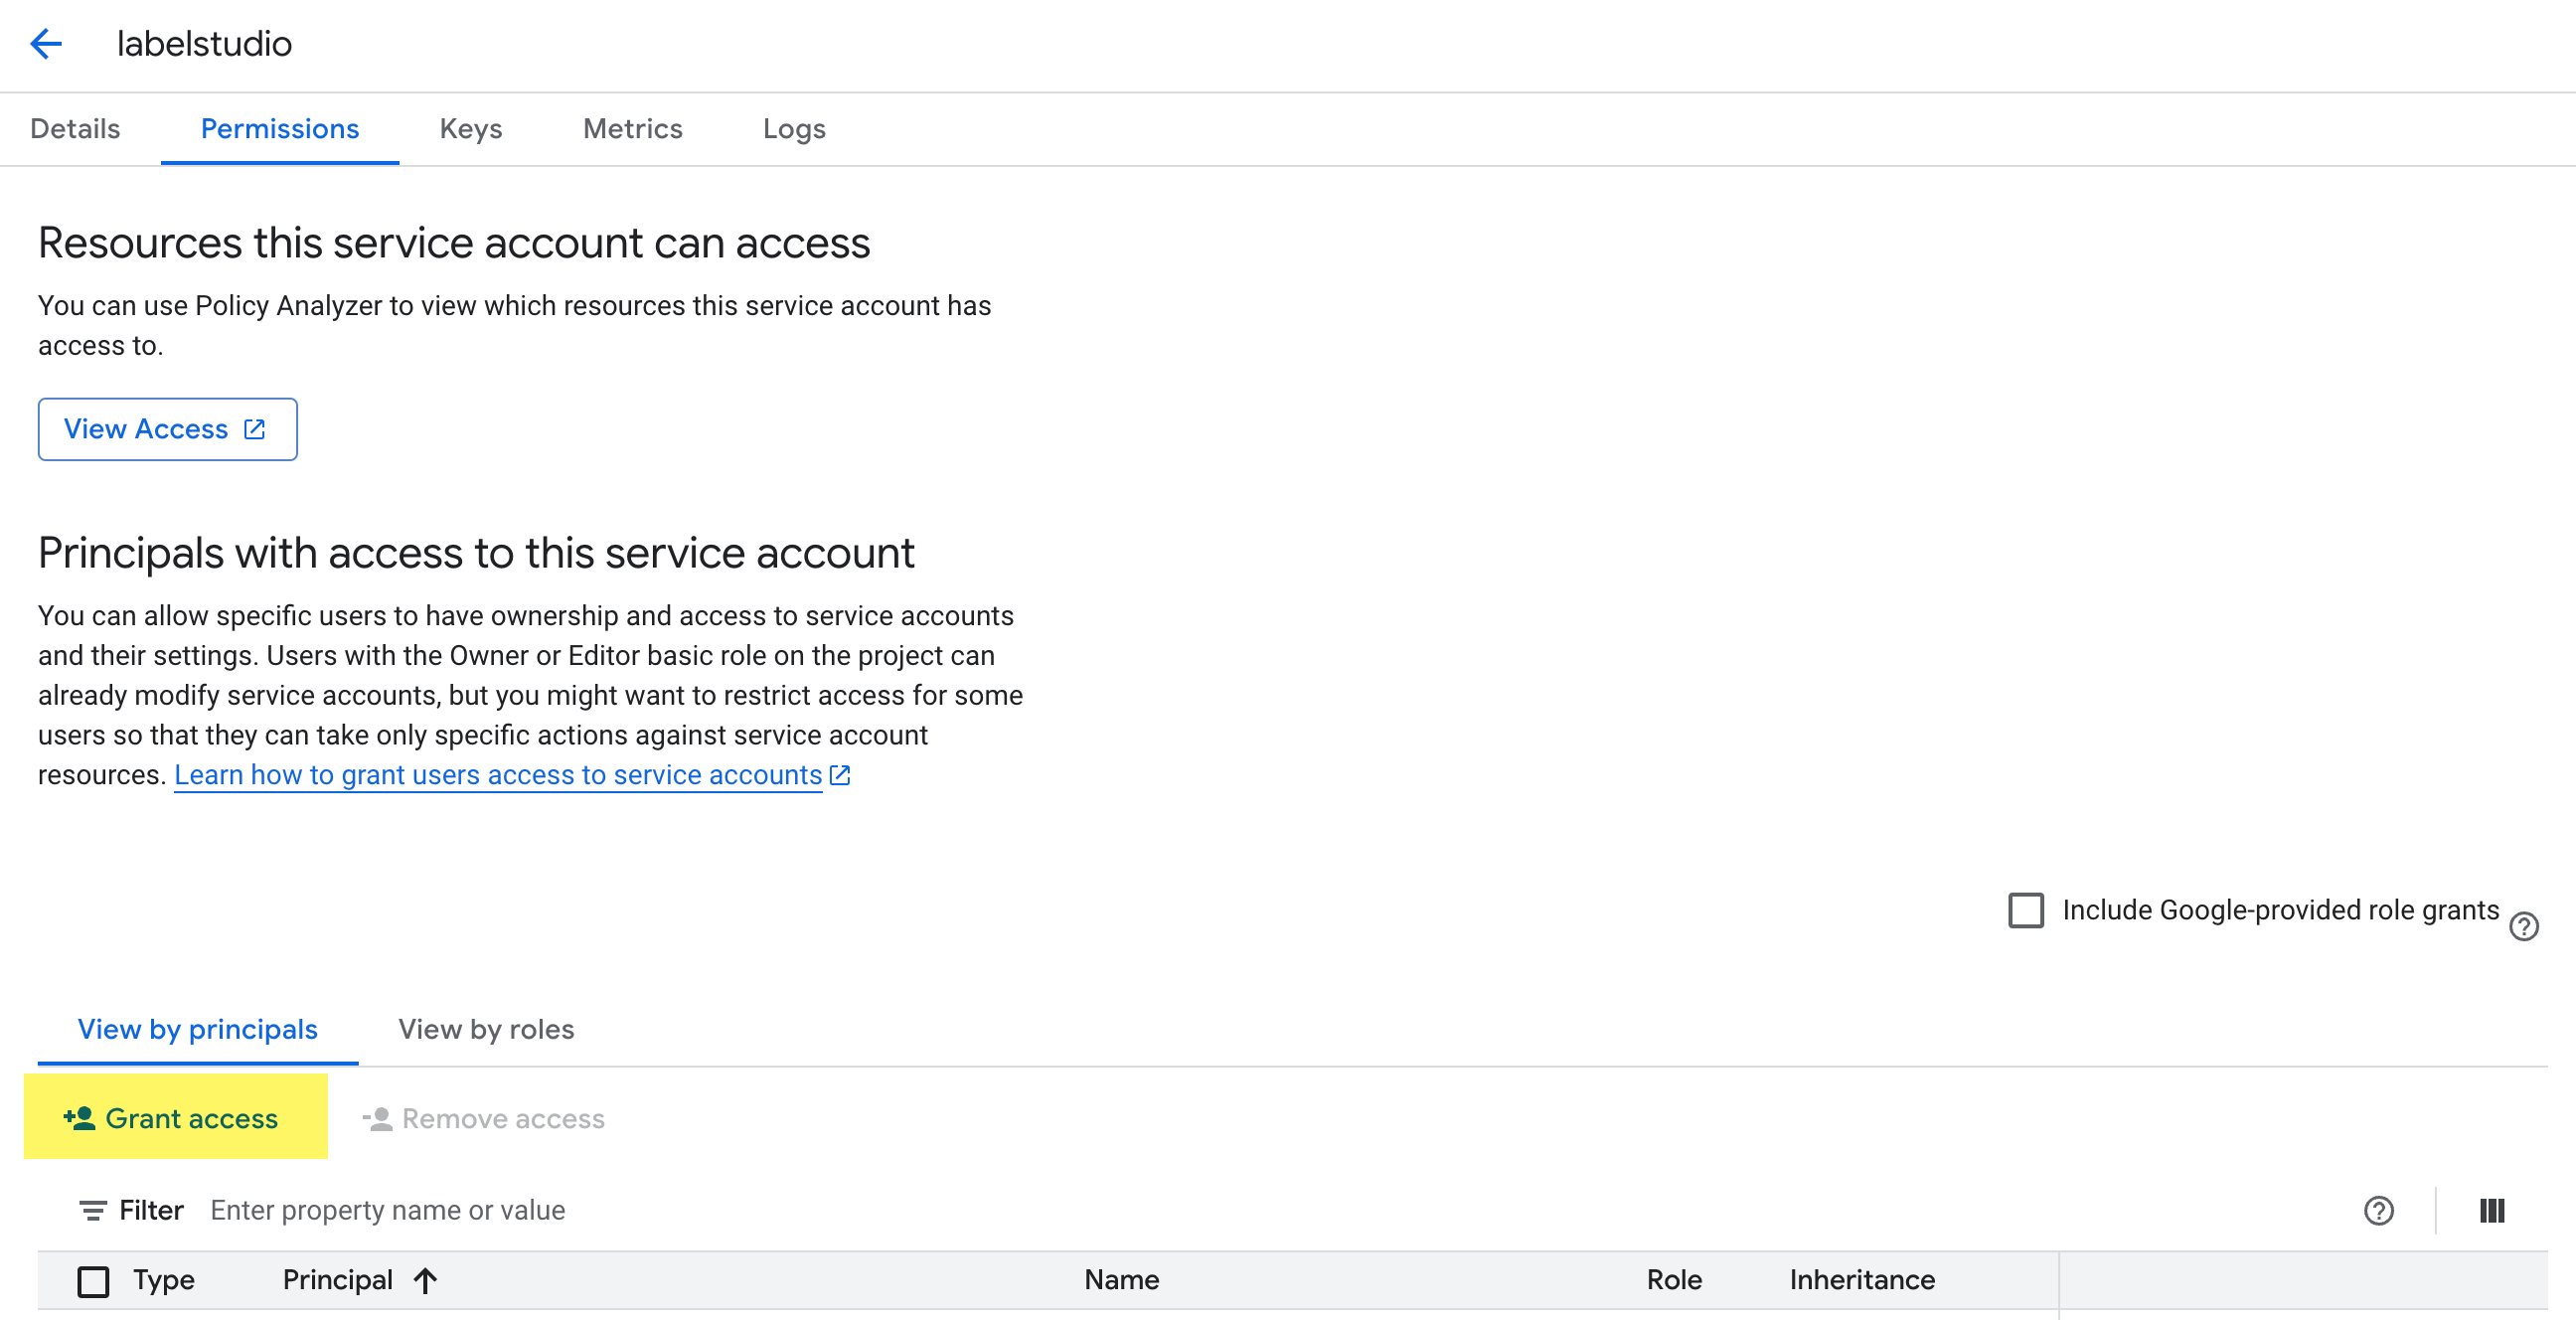
In the New principals field, add the following:
principalSet://iam.googleapis.com/projects/[PROJECT_NUMBER]/locations/global/workloadIdentityPools/[POOL_ID]/attribute.aws_role/arn:aws:sts::490065312183:assumed-role/label-studio-app-productionWhere:
[PROJECT_NUMBER]- Replace this with your Google project number. This is different than the project ID. To find the project number, go to IAM & Admin > Settings.[POOL_ID]- Replace this with the pool ID (the Name you entered in step 3 above, e.g.label-studio-pool-abc123).
Under Assign Roles, use the search field in the Role drop-down menu to find the Workload Identity User role.
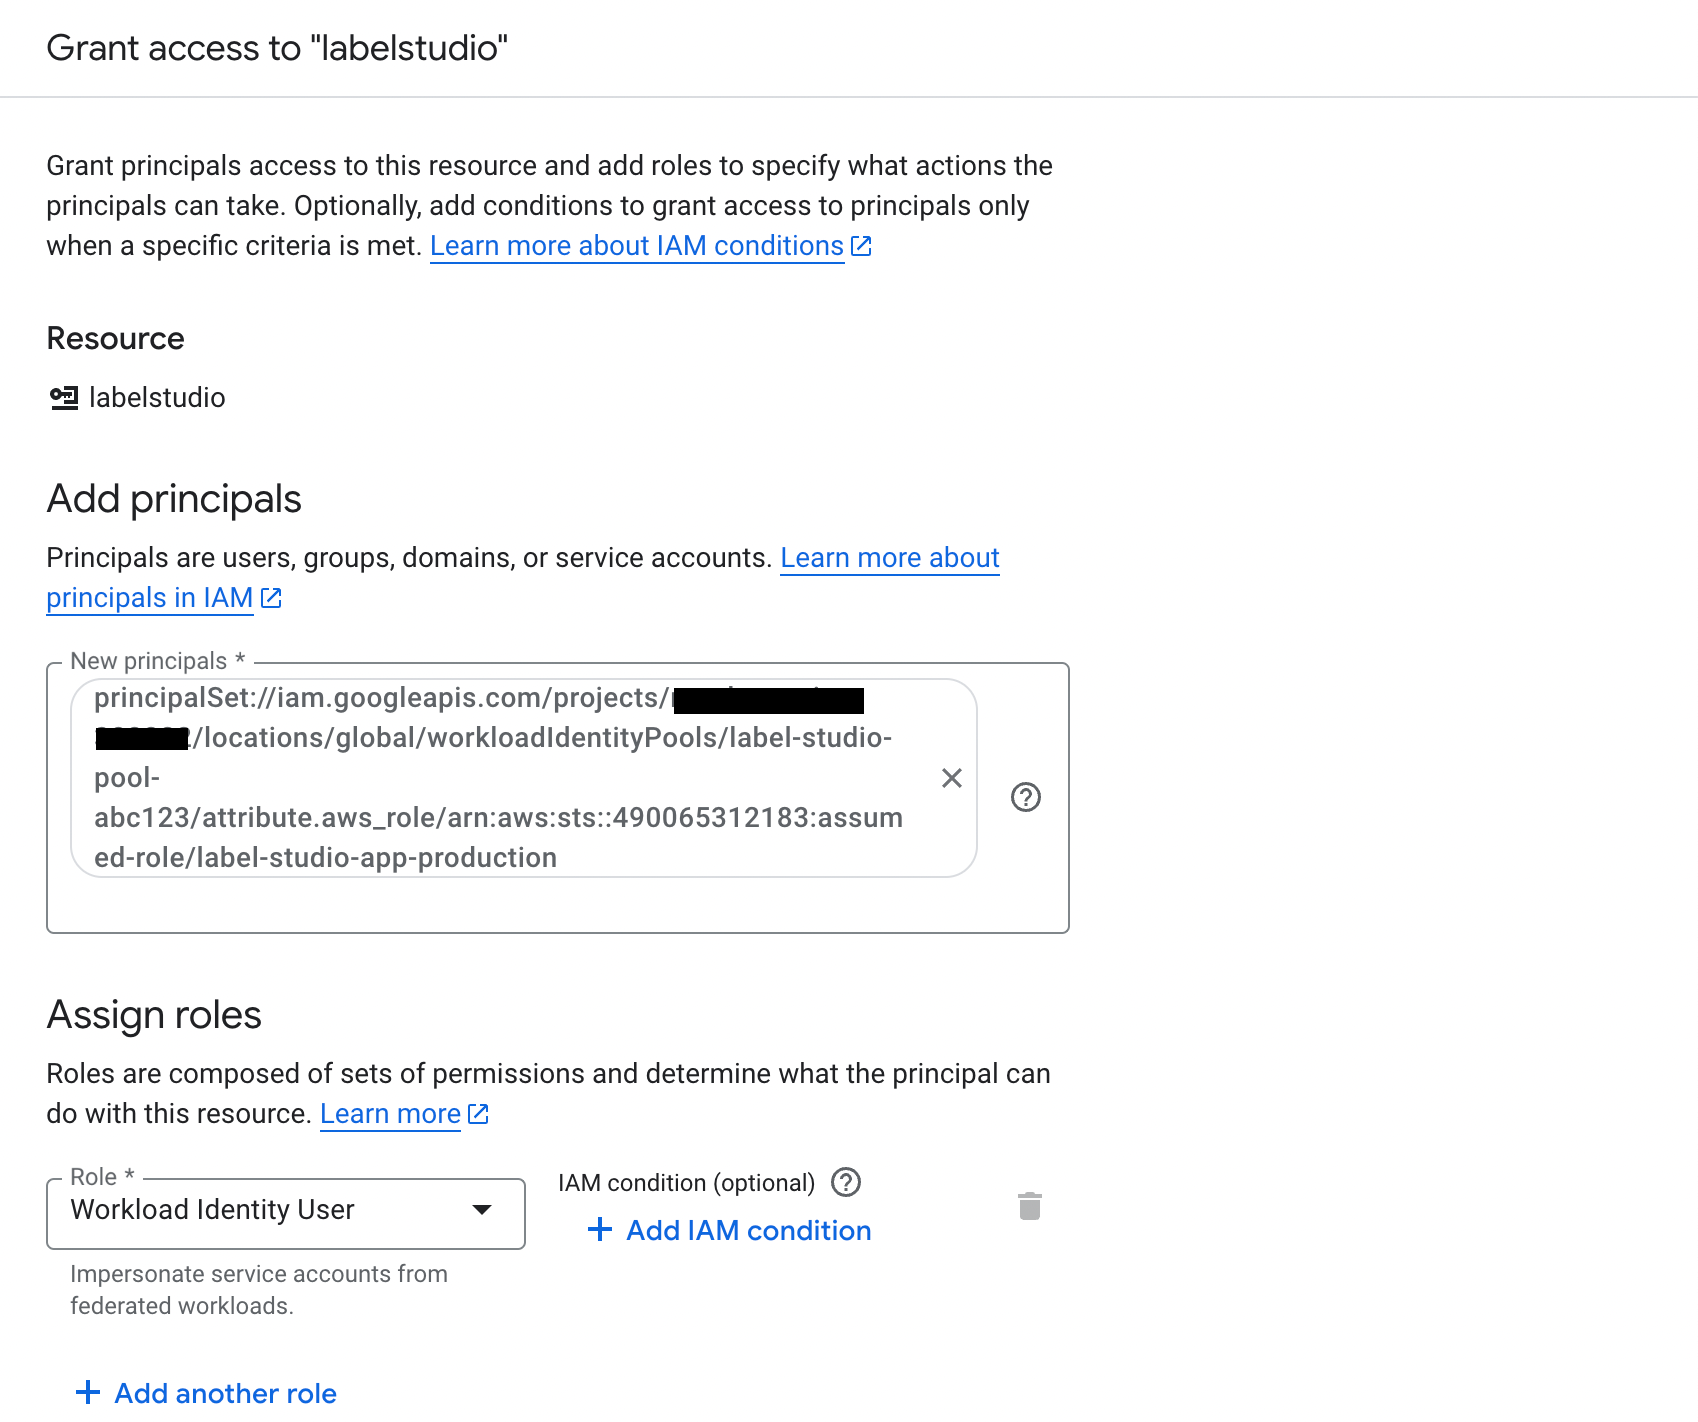
Click Save
Before setting up your connection in Label Studio, note the following (you will be asked to provide them)
- Your pool ID - available from IAM & Admin > Workload Identity Pools
- Your provider ID - available from IAM & Admin > Workload Identity Pools (this should be
label-studio-app-production) - Your service account email - available from IAM & Admin > Service Accounts. Select the service account and the email is listed under Details.
- Your Google project number - available from IAM & Admin > Settings
- Your Google project ID - available from IAM & Admin > Settings
Create a source storage connection
From Label Studio, open your project and select Settings > Cloud Storage > Add Source Storage.
Select Google Cloud Storage (WIF Auth) and click Next.
Configure Connection
Complete the following fields and then click Test connection:
| Field | Description |
|---|---|
| Storage Title | Enter a name to identify the storage connection. |
| Bucket Name | Enter the name of your GCS bucket. |
| Workload Identity Pool ID | This is the ID you specified when creating the Work Identity Pool. You can find this in Google Cloud Console under IAM & Admin > Workload Identity Pools. |
| Workload Identity Provider ID | This is the ID you specified when setting up the provider. You can find this in Google Cloud Console under IAM & Admin > Workload Identity Pools. |
| Service Account Email |
This is the email associated with the service account you set up as part of the prerequisites. You can find it in the Details page of the service account under IAM & Admin > Service Accounts. For example, labelstudio@random-string-382222.iam.gserviceaccount.com.
|
| Google Project ID | Your Google project ID. You can find this in Google Cloud Console under IAM & Admin > Settings. |
| Google Project Number | Your Google project number. You can find this in Google Cloud Console under IAM & Admin > Settings. |
| Use pre-signed URLs (On) / Proxy through the platform (Off) |
This determines how data from your bucket is loaded:
For more information, see Pre-signed URLs vs Storage proxies. |
| Expire pre-signed URLs (minutes) | Control how long pre-signed URLs remain valid. |
Import Settings & Preview
Complete the following fields and then click Load preview to ensure you are syncing the correct data:
| Bucket Prefix | Optionally, enter the directory name within your bucket that you would like to use. For example, data-set-1 or data-set-1/subfolder-2. |
| Import Method | Select whether you want create a task for each file in your bucket or whether you would like to use a JSON/JSONL/Parquet file to define the data for each task. |
| File Name Filter | Specify a regular expression to filter bucket objects. Use .* to collect all objects. |
| Scan all sub-folders | Enable this option to perform a recursive scan across subfolders within your container. |
Review & Confirm
If everything looks correct, click Save & Sync to sync immediately, or click Save to save your settings and sync later.
Tip
You can also use the API to sync import storage.
Create a target storage connection
From Label Studio, open your project and select Settings > Cloud Storage > Add Target Storage.
Select Google Cloud Storage (WIF Auth) and click Next.
Complete the following fields:
| Storage Title | Enter a name to identify the storage connection. |
| Bucket Name | Enter the name of your GCS bucket. |
| Bucket Prefix |
Optionally, enter the directory name within your bucket that you would like to use. For example, data-set-1 or data-set-1/subfolder-2.
|
| Workload Identity Pool ID | This is the ID you specified when creating the Work Identity Pool. You can find this in Google Cloud Console under IAM & Admin > Workload Identity Pools. |
| Workload Identity Provider ID | This is the ID you specified when setting up the provider. You can find this in Google Cloud Console under IAM & Admin > Workload Identity Pools. |
| Service Account Email |
This is the email associated with the service account you set up as part of the prerequisites. You can find it in the Details page of the service account under IAM & Admin > Service Accounts. For example, labelstudio@random-string-382222.iam.gserviceaccount.com.
|
| Google Project ID | Your Google project ID. You can find this in Google Cloud Console under IAM & Admin > Settings. |
| Google Project Number | Your Google project number. You can find this in Google Cloud Console under IAM & Admin > Settings. |
| Can delete objects from storage | Enable this option if you want to delete annotations stored in the bucket when they are deleted in Label Studio. Your credentials must include the ability to delete bucket objects. |
After adding the storage, click Sync.
Tip
You can also use the API to sync export storage.
Google Cloud Storage with service account impersonation for GKE
Google Cloud Storage service account impersonation allows a Google Cloud service account to temporarily assume the permissions of another service account without requiring access to its keys.
When deploying Label Studio on Google Kubernetes Engine (GKE), workloads typically authenticate using a Kubernetes service account mapped to a Google Cloud service account through Workload Identity. However, this directly linked GCP service account might not have broad access to your GCS buckets.
With service account impersonation, the workload’s GCP service account can instead impersonate a separate, more privileged service account that has the necessary storage permissions. This approach eliminates the need to create, distribute, and rotate long-lived service account keys, reducing the risk of credential leakage.
For more information, see:
Before you begin:
- Review the information in Cloud storage for projects and Secure access to cloud storage.
- Configure access to your bucket.
- You will need the base service account email from your Label Studio platform administrator. This is the GCP service account that is bound to the Kubernetes service account running Label Studio via GKE Workload Identity. If this has not been set up yet, see Configure the GKE project (platform administrator) below.
You will be working in two Google Cloud projects:
- Your base GKE project. This is where you have deployed Label Studio using GKE.
- Your target Google Cloud project. This is where your GCS buckets are located.
Configure the GKE project (platform administrator)
This is a one-time setup performed by the platform administrator who manages the Label Studio deployment in GKE. If this has already been completed, you can skip to Configure the target Google Cloud project and request the base service account email from your administrator.
Enable the feature flag
You must enable the fflag_feat_bros_763_gcs_sa_impersonation feature flag in your Label Studio deployment in order to use service account impersonation. You can add this under extraEnvironmentVars in your helm chart:
global:
  extraEnvironmentVars:
      fflag_feat_bros_763_gcs_sa_impersonation: "true"
note
The environment variable name must be lowercase. The Label Studio feature flag parser matches the fflag_ prefix in a case-sensitive manner.
Create a base service account
Create a GCP service account in the GKE project that will serve as the identity for your Label Studio pods. This is the “base” service account that will later be granted permission to impersonate target service accounts in other projects.
- From the Google Cloud Console, ensure you are in the GKE project (the project where Label Studio is deployed).
- Go to IAM & Admin > Service Accounts.
- Click Create Service Account.
- Enter a name and description (for example,
lse-base). - Click Done. No additional roles need to be granted at this stage.
- Note the service account email (for example,
lse-base@your-gke-project.iam.gserviceaccount.com). This is the base service account email that you will share with data teams who need to configure bucket access.
Bind the base service account to the Kubernetes service account
Use GKE Workload Identity to link the GCP base service account to the Kubernetes service account used by your Label Studio pods. This allows the pods to automatically authenticate as the base service account without managing keys.
Add the Workload Identity annotation to the Kubernetes service account used by Label Studio:
kubectl annotate serviceaccount label-studio-sa \
  --namespace=label-studio \
  iam.gke.io/gcp-service-account=BASE_SA_EMAIL
Replace
label-studio-saandlabel-studiowith your actual Kubernetes service account name and namespace, andBASE_SA_EMAILwith the email from the previous step.Grant the Workload Identity User role so the Kubernetes service account can act as the GCP service account:
gcloud iam service-accounts add-iam-policy-binding BASE_SA_EMAIL \
  --role="roles/iam.workloadIdentityUser" \
  --member="serviceAccount:GKE_PROJECT_ID.svc.id.goog[NAMESPACE/KSA_NAME]"
Where:
BASE_SA_EMAILis the base service account email (for example,lse-base@your-gke-project.iam.gserviceaccount.com).GKE_PROJECT_IDis the ID of your GKE project.NAMESPACEis the Kubernetes namespace where Label Studio is deployed (for example,label-studio).KSA_NAMEis the name of the Kubernetes service account used by Label Studio (for example,label-studio-sa).
Verify the binding is working by running a test pod:
kubectl run workload-identity-test \
  --image=google/cloud-sdk:slim \
  --serviceaccount=label-studio-sa \
  --namespace=label-studio \
  -it --rm -- gcloud auth list
The output should show the base service account email as the active account.
For more information, see Use Workload Identity in the Google Cloud documentation.
Using Terraform
resource "google_service_account" "lse_base" {
  project      = "your-gke-project"
  account_id   = "lse-base"
  display_name = "Label Studio Base SA"
}

resource "google_service_account_iam_member" "workload_identity_binding" {
  service_account_id = google_service_account.lse_base.name
  role               = "roles/iam.workloadIdentityUser"
  member             = "serviceAccount:your-gke-project.svc.id.goog[label-studio/label-studio-sa]"
}
Replace your-gke-project, label-studio, and label-studio-sa with your actual project ID, namespace, and Kubernetes service account name.
Configure the target Google Cloud project
Step 1: Create a service account in your target Google Cloud project
In your Google Cloud project where your bucket is located, create a service account that Label Studio will impersonate to access your data.
- From the Google Cloud Console, go to IAM & Admin > Service Accounts.
- Click Create Service Account.
- Enter a name and description (for example,
sa-label-studio-data). - Click Create and Continue.
- Note the service account email (for example,
sa-label-studio-data@your-data-project.iam.gserviceaccount.com). You will need this later.
See Create service accounts in the Google Cloud documentation.
Step 2: Grant the target service account access to your bucket
Grant the target service account the appropriate roles on the Google Cloud Storage bucket that you want to connect to Label Studio. The roles you need depend on how you plan to use the storage:
- For source storage (importing data):
roles/storage.objectViewer - For target storage (exporting annotations):
roles/storage.objectAdmin
roles/storage.objectAdmin is required for target storage because Label Studio needs to create, overwrite, and optionally delete objects in the bucket. If you only need write access without deletion, roles/storage.objectCreator is sufficient, but the Can delete objects from storage option will not work.
- Go to Cloud Storage > Buckets and select your bucket.
- Click Permissions and then click Grant Access.
- In the New principals field, enter the target service account email you received in step 1.
- In the Role dropdown, select Storage Object Viewer (
roles/storage.objectViewer) for source storage or Storage Object Admin (roles/storage.objectAdmin) for target storage. Use Add another role to add both if needed. - Click Save.
Using gcloud
For source storage (read access):
gcloud storage buckets add-iam-policy-binding gs://YOUR_BUCKET_NAME \
  --member="serviceAccount:TARGET_SA_EMAIL" \
  --role="roles/storage.objectViewer"
For target storage (write and delete access):
gcloud storage buckets add-iam-policy-binding gs://YOUR_BUCKET_NAME \
  --member="serviceAccount:TARGET_SA_EMAIL" \
  --role="roles/storage.objectAdmin"
Replace YOUR_BUCKET_NAME and TARGET_SA_EMAIL with your values.
Step 3: Allow impersonation from the Label Studio base service account
This step authorizes the Label Studio base service account (running in GKE) to impersonate your target service account.
Grant roles/iam.serviceAccountTokenCreator to the base service account on the target service account. This role also includes the signBlob permission, which Label Studio uses to generate pre-signed URLs for direct browser access to stored objects.
- Go to IAM & Admin > Service Accounts and select the target service account you created in step 1.
- Click the Permissions tab and then click Grant Access.
- In the New principals field, enter the base service account email provided by your Label Studio platform administrator in the base account.
- In the Role dropdown, select Service Account Token Creator (
roles/iam.serviceAccountTokenCreator). - Click Save.
Using gcloud
gcloud iam service-accounts add-iam-policy-binding TARGET_SA_EMAIL \
  --member="serviceAccount:BASE_SA_EMAIL" \
  --role="roles/iam.serviceAccountTokenCreator"
Where:
TARGET_SA_EMAILis the email of the target service account you received in step 1.BASE_SA_EMAILis the base service account email provided by your Label Studio platform administrator in the base account.
Step 4: Configure CORS on the bucket (required for pre-signed URLs)
If you plan to use pre-signed URLs (the default), you must configure Cross-Origin Resource Sharing (CORS) on your GCS bucket so that the annotator’s browser can load media files directly from Google Cloud Storage.
Create a file called
cors.jsonwith the following content:[ { "origin": ["https://your-label-studio-domain.com"], "method": ["GET", "HEAD"], "responseHeader": ["Content-Type", "Content-Range", "Content-Disposition"], "maxAgeSeconds": 3600 } ]Replace
https://your-label-studio-domain.comwith the URL where your Label Studio instance is accessible.Apply the CORS configuration to the bucket:
gcloud storage buckets update gs://YOUR_BUCKET_NAME --cors-file=cors.jsonVerify the CORS configuration:
gcloud storage buckets describe gs://YOUR_BUCKET_NAME --format="default(cors_config)"
If you are using Proxy through the platform mode instead of pre-signed URLs, CORS configuration is not required because all traffic flows through the Label Studio server.
Create a source storage connection
From Label Studio, open your project and select Settings > Cloud Storage > Add Source Storage.
Select Google Cloud Storage (SA Impersonation) and click Next.
Configure Connection
Complete the following fields and then click Test connection:
| Field | Description |
|---|---|
| Storage Title | Enter a name to identify the storage connection. |
| Bucket Name | Enter the name of your Google Cloud Storage bucket. |
| Target Service Account Email |
Enter the email of the target service account you created in step 1 (for example, sa-label-studio-data@your-data-project.iam.gserviceaccount.com).
|
| Google Project ID |
Enter the ID of the Google project in which the bucket is located (for example, your-data-project). You can find this in Google Cloud Console under IAM & Admin > Settings.
|
| Use pre-signed URLs (On) / Proxy through the platform (Off) |
This determines how data from your bucket is loaded:
For more information, see Pre-signed URLs vs Storage proxies. |
| Expire pre-signed URLs (minutes) | Control how long pre-signed URLs remain valid. |
Import Settings & Preview
Complete the following fields and then click Load preview to ensure you are syncing the correct data:
| Bucket Prefix | Optionally, enter the directory name within your bucket that you would like to use. For example, data-set-1 or data-set-1/subfolder-2. |
| Import Method | Select whether you want create a task for each file in your bucket or whether you would like to use a JSON/JSONL/Parquet file to define the data for each task. |
| File Name Filter | Specify a regular expression to filter bucket objects. Use .* to collect all objects. |
| Scan all sub-folders | Enable this option to perform a recursive scan across subfolders within your container. |
Review & Confirm
If everything looks correct, click Save & Sync to sync immediately, or click Save to save your settings and sync later.
Create a target storage connection
From Label Studio, open your project and select Settings > Cloud Storage > Add Target Storage.
Select Google Cloud Storage (SA Impersonation) and click Next.
Complete the following fields:
| Storage Title | Enter a name to identify the storage connection. |
| Bucket Name | Enter the name of your GCS bucket. |
| Bucket Prefix |
Optionally, enter the directory name within your bucket that you would like to use. For example, data-set-1 or data-set-1/subfolder-2.
|
| Target Service Account Email |
Enter the email of the target service account you created in Step 1 (for example, sa-label-studio-data@your-data-project.iam.gserviceaccount.com).
|
| Google Project ID |
Enter the ID of the Google project in which the bucket is located (for example, your-data-project). You can find this in Google Cloud Console under IAM & Admin > Settings.
|
| Can delete objects from storage | Enable this option if you want to delete annotations stored in the bucket when they are deleted in Label Studio. This requires the target service account to have roles/storage.objectAdmin on the bucket (see Step 2). |
After adding the storage, click Sync.
Troubleshooting
| Error | Cause | Solution |
|---|---|---|
| No Google Cloud Storage (SA Impersonation) option in Label Studio | You have not enabled the required feature flag. | Set the feature flag in your Label Studio GKE deployment (see Enable the feature flag). Note that the environment variable must be lowercase: fflag_feat_bros_763_gcs_sa_impersonation. |
Permission 'iam.serviceAccounts.getAccessToken' denied on resource (or it may not exist) |
The base service account does not have permission to impersonate the target service account. | Verify that the base service account has roles/iam.serviceAccountTokenCreator on the target service account (see Step 3). |
404 Service account not found |
The target service account email is incorrect or the account does not exist. | Verify the email ends with .iam.gserviceaccount.com and that the account exists in your GCP project. |
Permission 'storage.buckets.get' denied on resource or 403 Access denied to bucket |
The target service account does not have the necessary permissions on the bucket. | Grant roles/storage.objectViewer (for source storage) or roles/storage.objectAdmin (for target storage) to the target service account on the bucket (see Step 2). |
| Images or media files not loading; CORS errors in browser console | The GCS bucket does not have CORS configured for your Label Studio domain. This only applies when using pre-signed URLs. | Add a CORS policy to the bucket allowing GET and HEAD from your Label Studio URL (see Step 4). |
Add storage with the Label Studio API
You can also use the API to programmatically create connections. See our API documentation.
IP filtering for enhanced security for GCS
Google Cloud Storage offers bucket IP filtering as a powerful security mechanism to restrict access to your data based on source IP addresses. This feature helps prevent unauthorized access and provides fine-grained control over who can interact with your storage buckets.
Read more about Source storage behind your VPC.
Common Use Cases:
- Restrict bucket access to only your organization’s IP ranges
- Allow access only from specific VPC networks in your infrastructure
- Secure sensitive data by limiting access to known IP addresses
- Control access for third-party integrations by whitelisting their IPs
How to Set Up IP Filtering
- First, create your GCS bucket through the console or CLI
- Create a JSON configuration file to define IP filtering rules. You have two options:
For public IP ranges:
{
  "mode": "Enabled",
  "publicNetworkSource": {
    "allowedIpCidrRanges": [
      "xxx.xxx.xxx.xxx", // Your first IP address
      "xxx.xxx.xxx.xxx", // Your second IP address
      "xxx.xxx.xxx.xxx/xx" // Your IP range in CIDR notation
    ]
  }
}
note
If you're using Label Studio Enterprise at app.humansignal.com and accessing it from your office network:
- Add Label Studio Enterprise outgoing IP addresses (see IP ranges)
- Add your office network IP range (e.g. 192.168.1.0/24)
- If both Label Studio Enterprise and your office are on the same VPN network (e.g. 10.0.0.0/16), you only need to add that VPN subnet
For VPC network sources:
{
  "mode": "Enabled",
  "vpcNetworkSources": [
    {
      "network": "projects/PROJECT_ID/global/networks/NETWORK_NAME",
      "allowedIpCidrRanges": [
        RANGE_CIDR
      ]
    }
  ]
}
Apply the IP filtering rules to your bucket using the following command:
gcloud alpha storage buckets update gs://BUCKET_NAME --ip-filter-file=IP_FILTER_CONFIG_FILETo remove IP filtering rules when no longer needed:
gcloud alpha storage buckets update gs://BUCKET_NAME --clear-ip-filter
Limitations to Consider
- Maximum of 200 IP CIDR blocks across all rules
- Maximum of 25 VPC networks in the IP filter rules
- Not supported for dual-regional buckets
- May affect access from certain Google Cloud services